

3 of 10: Docker in a LinuX Container.
Or: Docker Setup on my Homelab.

Thank you for reading this post.
My name is Brian and I'm a developer from New Zealand. I've been interested in computers since the early 1990s. My first language was QBASIC. (Things have changed since the days of MS-DOS.)
I am the managing director of a one-man startup called Digital Core (NZ) Limited. I have accepted the "12 Startups in 12 Months" challenge so that DigitalCore will have income-generating products by April 2024.
This blog will follow the "12 Startups" project during its design, development, and deployment, cover the Agile principles and the DevOps philosophy that is used by the "12 Startups" project, and delve into the world of AI, machine learning, deep learning, prompt engineering, and large language models.
I hope you enjoyed this post and, if you did, I encourage you to explore some others I've written. And remember: The best technologies bring people together.
Homelab | LXD Manager | Docker | Docker Desktop | Deno | MariaDB | Portainer | More Docker | Docker Swarm | CrowdSec
TL;DR.
Create a Docker-compatible LinuXContainer, set up storage, install Docker within the container, add a user account, and install an SSH server for security.
An Introduction.
My previous post in this 8-part mini-series covered how I installed LXD on my remote homelab system. This time, I'm going to show how I create a remote container for running Docker.
The purpose of this post is to present the process of running Docker within an LXD container.
Containers are great virtualization environments because they isolate running processes from my homelab system. After running these containers, I can easily delete any of them. LinuXContainers (LXCs) are better than virtual machines because they use fewer resources while running their virtual processes.
In a previous post, I discussed installing the LXD container manager on my homelab system. This time, I'm going to use LXD to create a container, make it Docker-compatible and, after deploying the container, install Docker within that container.
The Big Picture.
It's Big Picture time and, if I go high enough, I can peek over the horizon. The advantage of a 10,000-metre-high view is I can see where I want to go (strategic planning) and decide if what I'm about to do (tactical activity) will help, or hinder, my progress toward a mid-term goal.
In the mid-term, I want to configure a number of services where I try to arrange them into easy-to-maintain, yet simple to expand, structures. Once this goal is achieved, I can then look into horizontal scaling as a form of fail-over protection. (I've given myself until the end of June 2023 to decide on the configuration of my long-term service operations.)
In the short term, I need a platform where I can create a number of services, connect these services into different configurations, simulate the loads these services will encounter, and measure their responses under ever-increasing pressure.
Now that I know what I want to achieve, it's time to build the first part of my lab.
Creating an LXC Image for Docker.

NOTE: Remember, LXC (lek-see) is an abbreviation for LinuXContainer.
These are the steps I follow after opening a terminal (CTRL + ALT + T).
- From the
homelabterminal, I initialise an image calleddockerthat is built with theUbuntu 22.04image:
lxc init ubuntu:22.04 docker
- I list all the images and containers that are available on the system. (There should only be one image listed (it's an image because the STATE is STOPPED)):
lxc ls
NOTE: Images and containers are THE SAME THING, but exist in different states. When starting an image, it changes to being a container. When a container is stopped, it changes back to being an image. Again, images are static snapshots while containers are running (dynamic) instances.
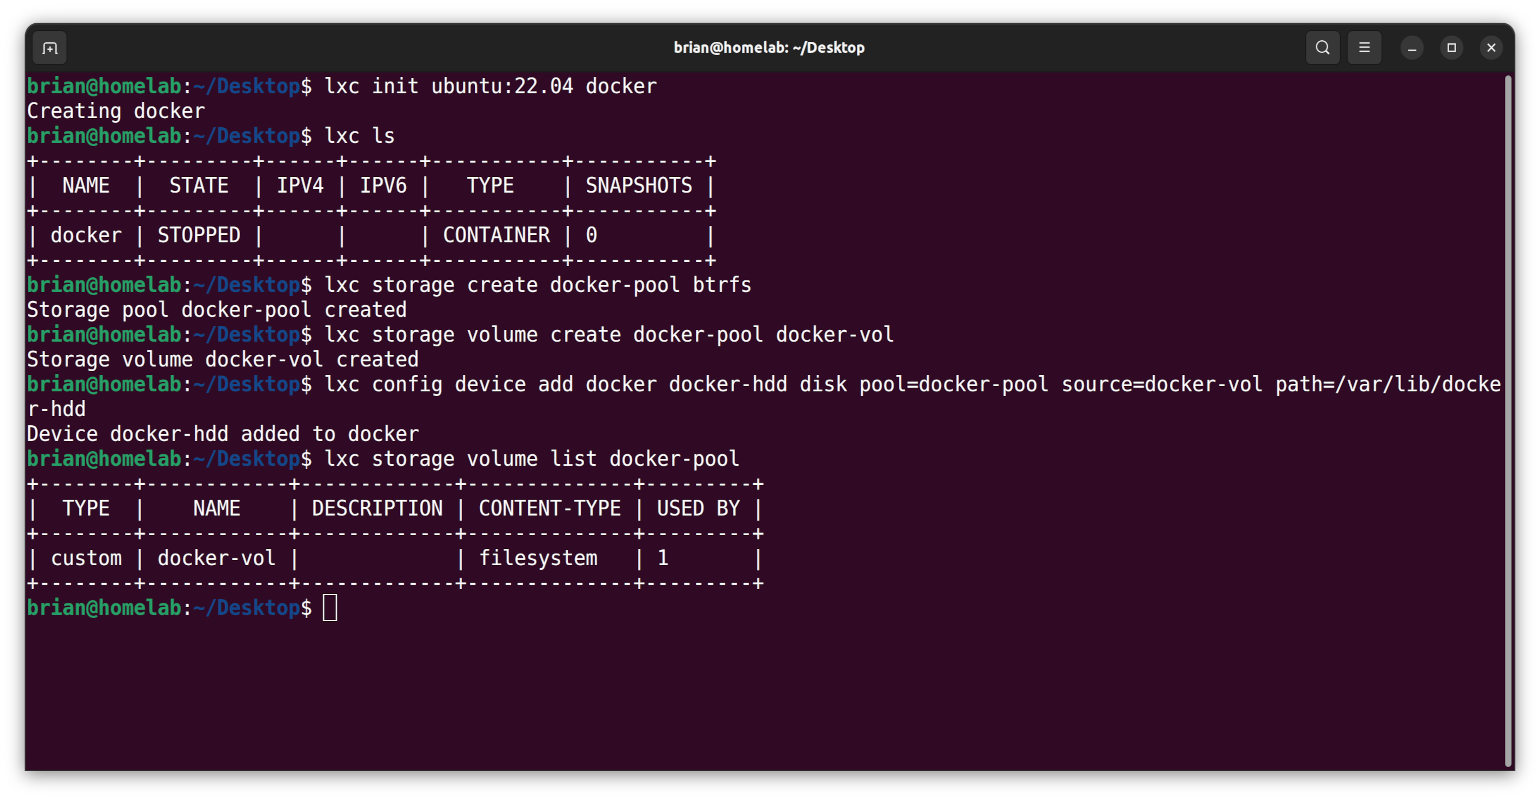
The next step is to create storage for the container.
Attribution:
blog.simos.info
OPTIONAL: Creating Storage for the Container.

In the previous post, I installed (and initialised) the LXD container manager. As part of that process, I could have created a ZFS pool on the external partition. Docker does not support ZFS, but it does support BTRFS. Therefore, this section involves setting up a BTRFS pool.
- From the
homelabterminal, I create a storage pool calleddocker-poolthat uses thebtrfsfile system:
lxc storage create docker-pool btrfs
- I create a volume called
docker-volwithindocker-pool:
lxc storage volume create docker-pool docker-vol
- I attach the
dockerimage to a new device calleddocker-hdd:
lxc config device add docker docker-hdd disk pool=docker-pool source=docker-vol path=/var/lib/docker-hdd
NOTE: Devices can be added to, or removed from, a running container. VMs also support hotplugging for some device types, but not all.
- I list the volumes within the
docker-poolstorage pool:
lxc storage volume list docker-pool
NOTE: Although the
docker-poolstorage pool is used by 1 device, thedocker-hdddevice I configured in the previous step, I can easily connect other devices to this storage pool.
Here are my results:
The next step is to tweak the Docker image.
Tweaking the Docker Image.

Running a container system, like Docker, within another container system, like LXD, will cause issues that need addressing.
- From the
homelabterminal, I set nesting to true:
lxc config set docker security.nesting true
- I set mknod to true:
lxc config set docker security.syscalls.intercept.mknod true
- I set setxattr to true:
lxc config set docker security.syscalls.intercept.setxattr true
- I show the
dockerconfiguration to check these settings:
lxc config show docker
The next step is to install a Docker instance within the container.
Attribution:
ubuntu.com
Installing Docker within the Container.
- From the
homelabterminal, I start thedockerimage:
lxc start docker
- I bash into the
dockercontainer:
lxc exec docker -- bash
- I update and upgrade the container:
apt clean && apt update && apt dist-upgrade -y && apt autoremove -y
- I install the following requirements:
# apt install -y ca-certificates curl gnupg lsb-release
- I make a
keyringsdirectory:
mkdir -m 0755 -p /etc/apt/keyrings
- I add Docker’s official GPG key:
curl -fsSL https://download.docker.com/linux/ubuntu/gpg | sudo gpg --dearmor -o /etc/apt/keyrings/docker.gpg
- I change the mode of the
docker.gpgfile:
sudo chmod a+r /etc/apt/keyrings/docker.gpg
- I install the
Dockerrepository:
echo \
  "deb [arch="$(dpkg --print-architecture)" signed-by=/etc/apt/keyrings/docker.gpg] https://download.docker.com/linux/ubuntu \
  "$(. /etc/os-release && echo "$VERSION_CODENAME")" stable" | \
  sudo tee /etc/apt/sources.list.d/docker.list > /dev/null
- I update the local repo (and everything else):
sudo apt clean && sudo apt update && sudo apt dist-upgrade -y && sudo apt autoremove -y
- I install
Dockerand its peripherals:
sudo apt install -y docker-ce docker-ce-cli containerd.io docker-buildx-plugin docker-compose-plugin
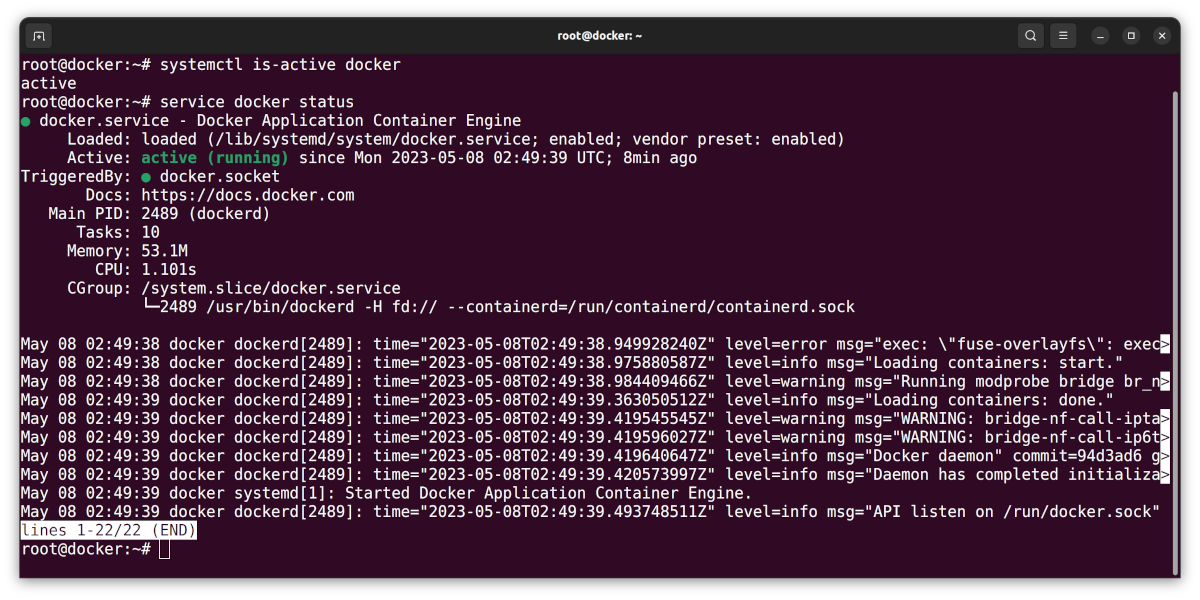
- I check if
Dockeris active:
systemctl is-active docker
- I check the status of
Docker:
service docker status
Here are my results:
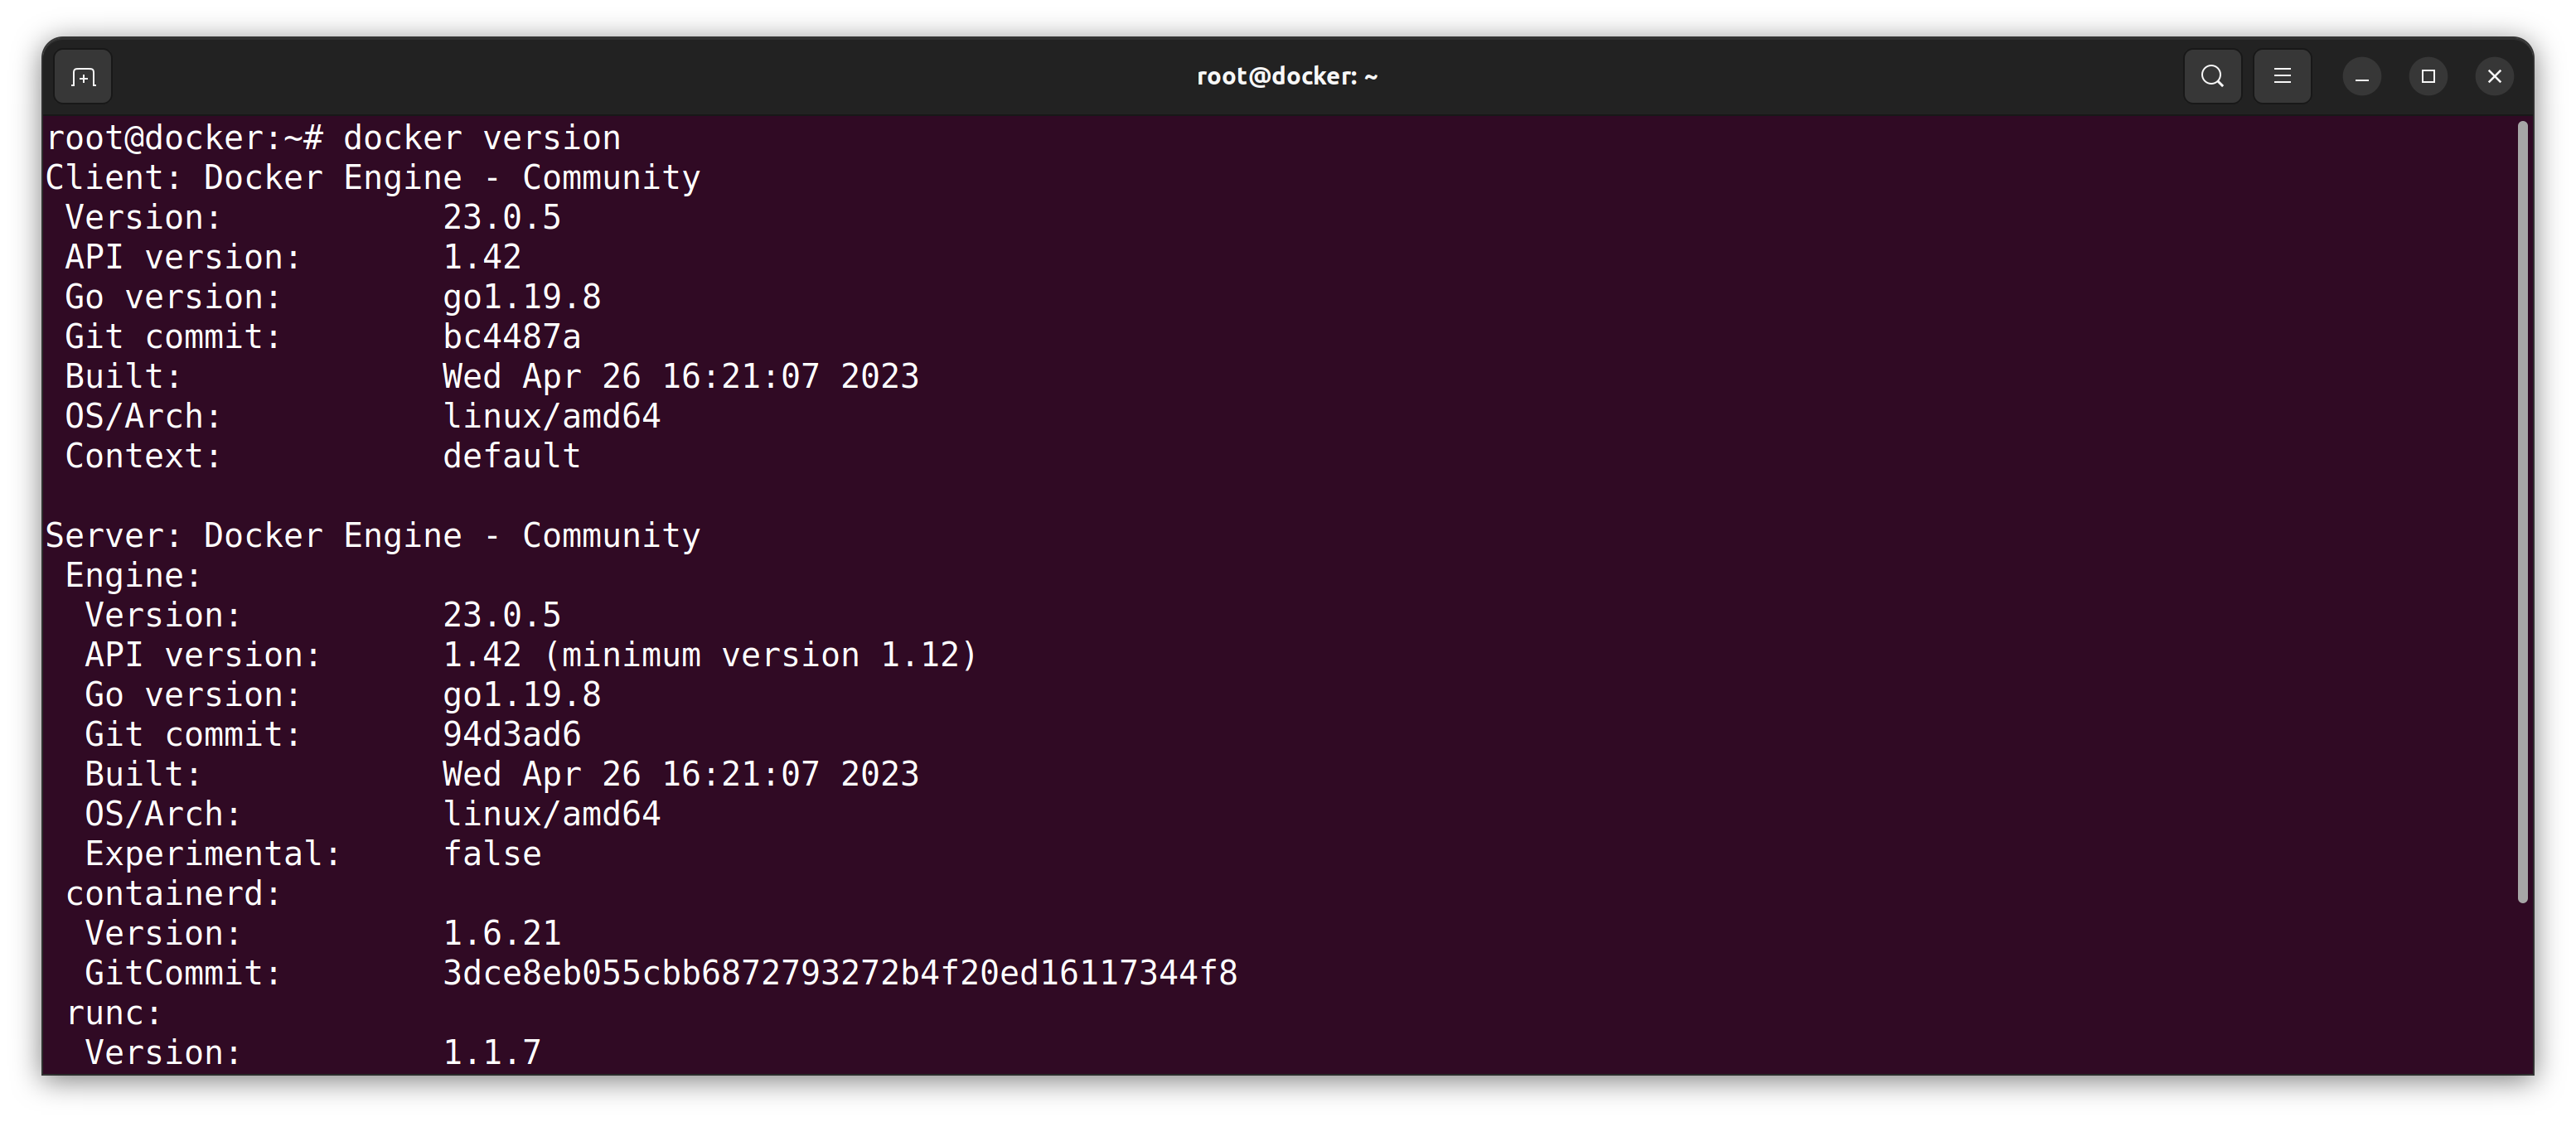
- I check the
Dockerversion:
sudo docker version
Here is my result:
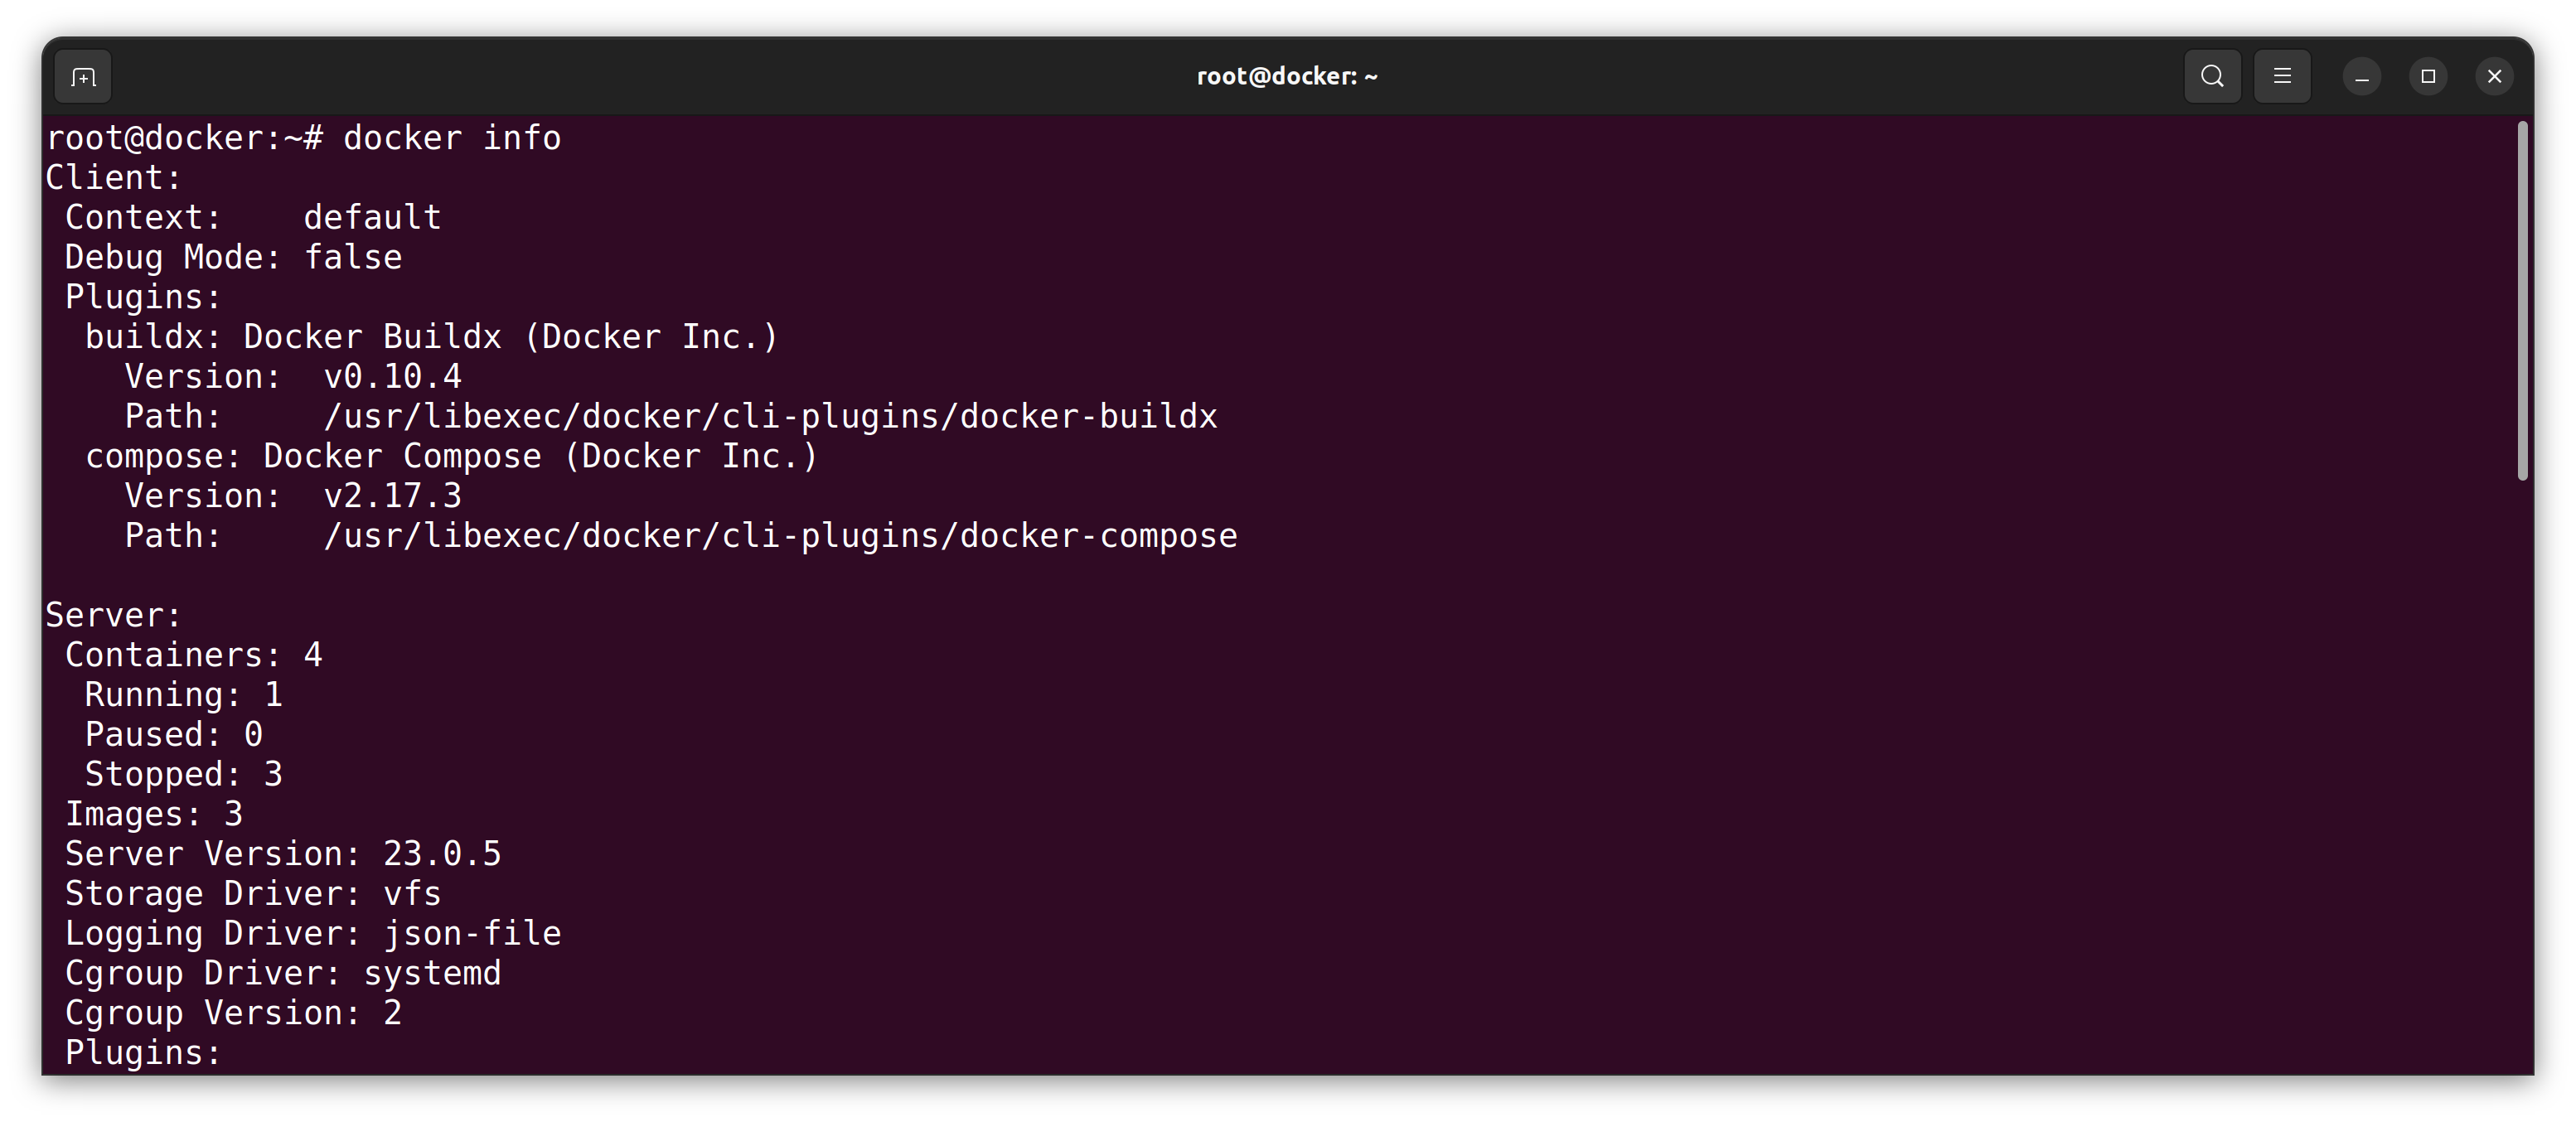
- I list the information for Docker:
sudo docker info
Here is my result:
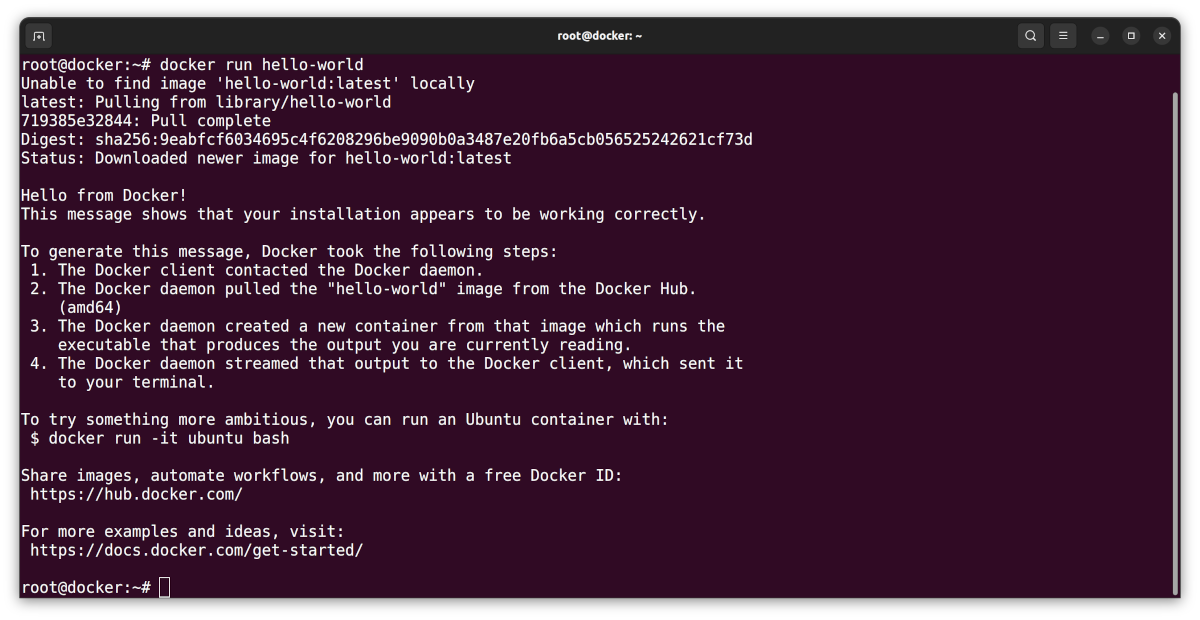
- I verify the installation:
sudo docker run hello-world
And again, here are my results:
- I exit the Docker container:
exit
The next step is to check the storage pool.
Attribution:
ubuntu.com
Checking the Storage Pool.

- From the
homelabterminal, I display a list of all the available storage pools:
lxc storage list

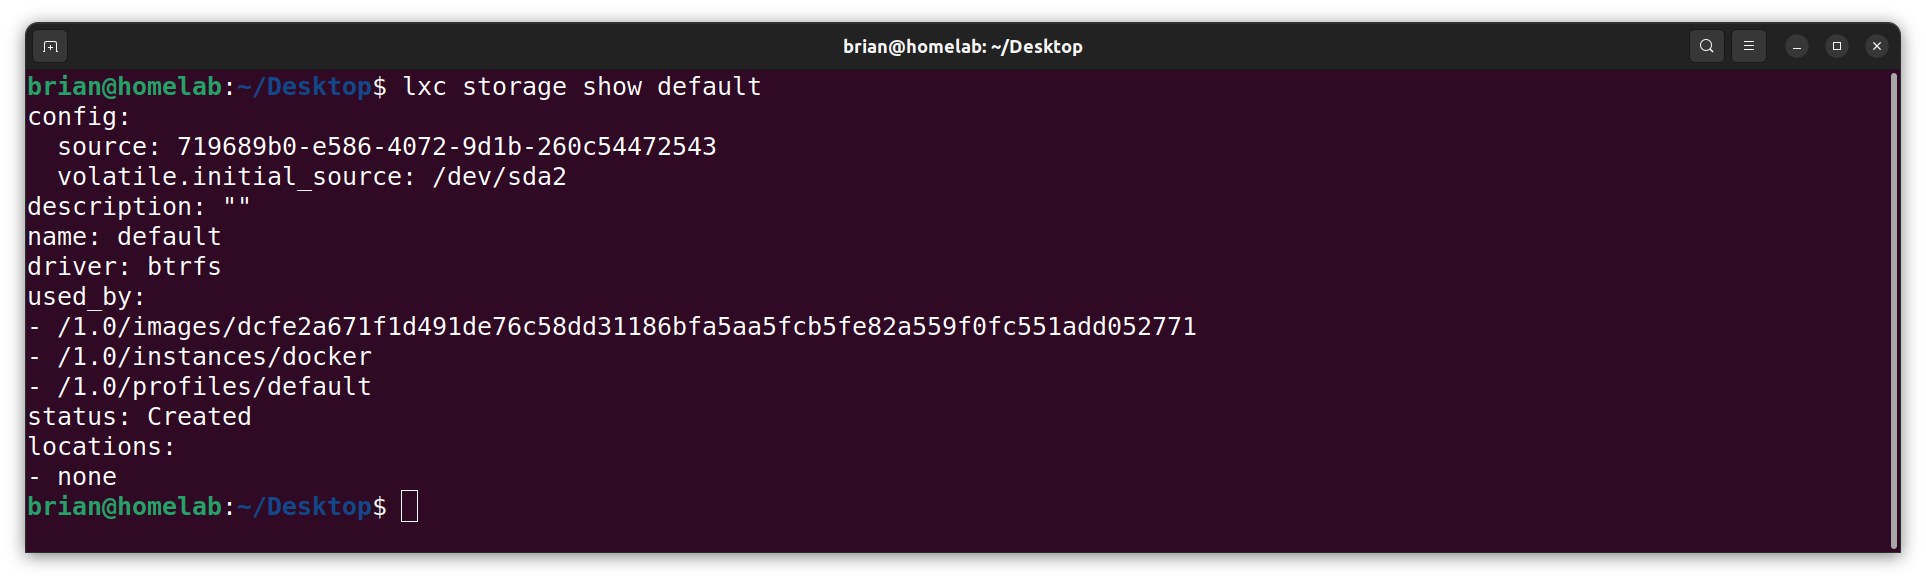
- I show detailed information about the default pool:
lxc storage show default
- I display the usage information for the default pool:
lxc storage info default
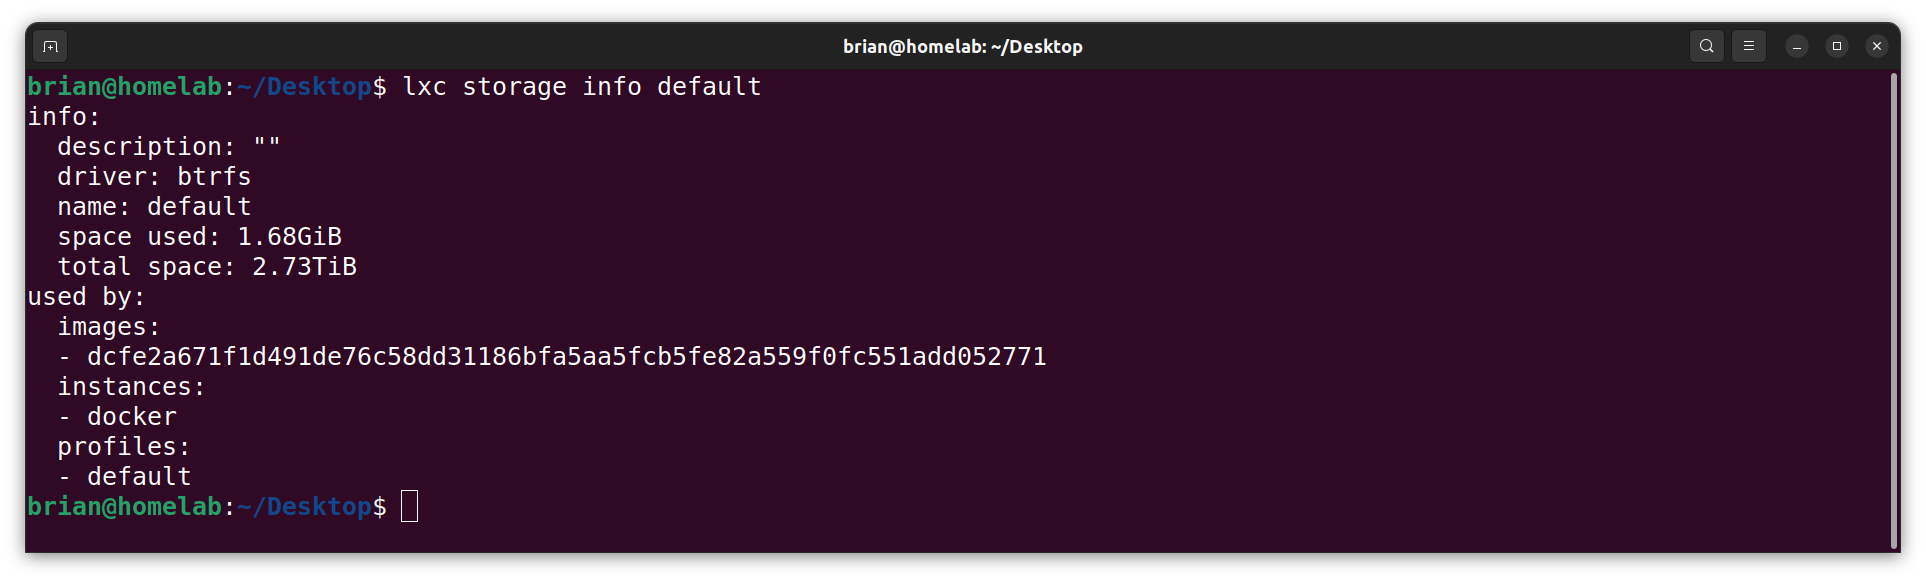
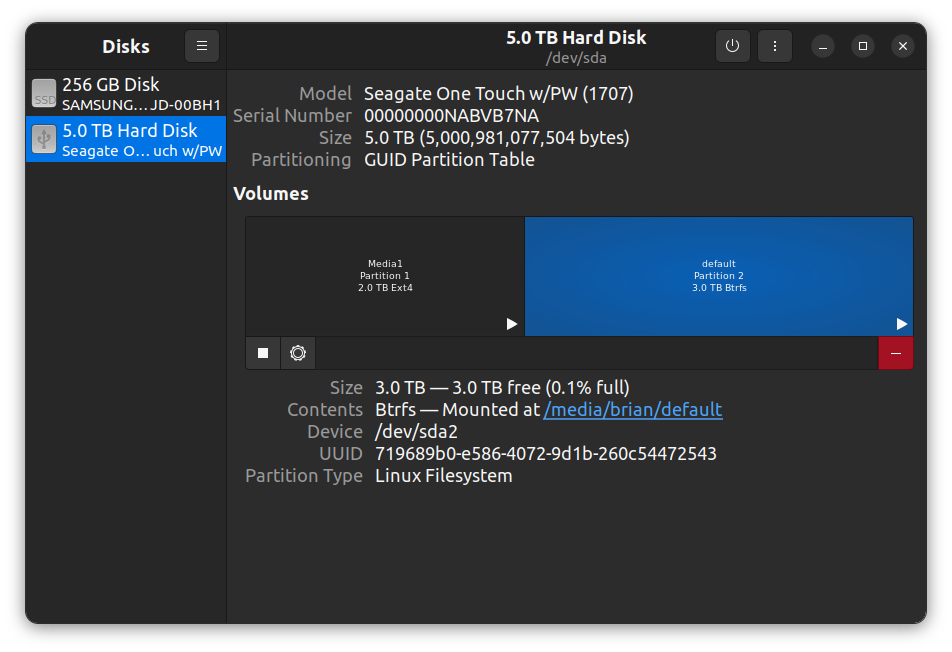
NOTE: The total space listed above (2.73TB formatted) is the same as the size listed below (3.0TB unformatted):
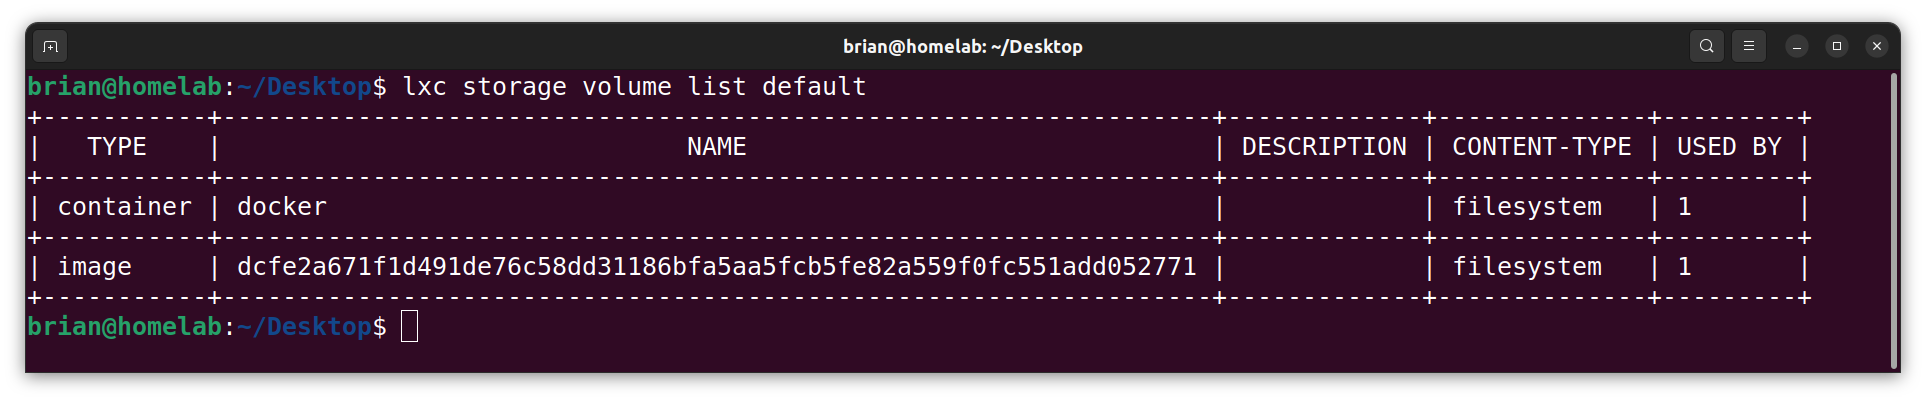
- I list all the available storage volumes in the default pool:
lxc storage volume list default
The next step is to add a user account to the Docker container.
Adding a User Account to the Docker Container.

- From the
homelabterminal, I bash into thedockercontainer:
lxc exec docker -- bash
- I add a new user:
adduser yt
- I add the new user to the
sudogroup:
usermod -aG sudo yt
- I exit the container:
exit
The next step is to install OpenSSH within the container.
Installing OpenSSH within the Docker Container.

I can use OpenSSH to block access to this container.
- From the
homelabterminal, I log in to the container with the 'yt' account:
lxc exec container-name -- su yt
- I install OpenSSH:
sudo apt install openssh-server -y
- I can check the status of OpenSSH:
sudo systemctl status sshd
- If needed, I can enable OpenSSH:
sudo systemctl enable --now ssh
The next step is to configure the SSH file in the container.
Configuring the SSH File in the Container.
This section will open up the container so it can be accessed with a username and password. This is the reason why I added a user account, and password, to the container: To gain access to the container from my workstation terminal.
- Within the Docker container, I open the "sshd_config" file:
nano /etc/ssh/sshd_config
- I edit, and save, the following "sshd_config" settings:
PasswordAuthentication yes
NOTE: I will return to this file later in the post specifically to alter this, and other, settings.
- I test the SSH configuration:
sshd -t
- I restart the SSH system:
sudo systemctl restart ssh.service
- I
rebootthe container:
sudo reboot
- And finally, on the remote
homelabsystem, I display the IP address for the new container:
lxc ls
Now that I have OpenSSH installed, the next step is to harden the container with UFW and Fail2Ban.
Enabling, and Setting Up, UFW.
Yes, the Uncomplicated FireWall was installed on the homelab system. This time, I am installing the "hardening" tools within the Docker container.
- Within the Docker container, I check the UFW status:
sudo ufw status
- I enable the UFW:
sudo ufw enable
- I install a UFW rule:
sudo ufw allow from 192.168.?.?
NOTE: I replace the IP address above with the actual address for the
workstation, e.g. 192.168.188.41.
- I check the status of the UFW:
sudo ufw status
NOTE: UFW will, by default, block all incoming traffic, including SSH and HTTP.
ANOTHER NOTE: I will update the UFW rules as I deploy other services to the container.
- I list the UFW rules by number:
sudo ufw status numbered
- I delete a UFW rule by number:
sudo ufw delete 1
- I disable UFW if required:
sudo ufw disable
Now that the UFW is setup, let's install another tool for hardening a system: Fail2Ban.
Attribution:
digitalocean.com
Installing, and Setting Up, Fail2Ban.

Fail2Ban protects Linux systems against many security threats, such as dictionary, DoS, DDoS, and brute-force attacks.
- Within the Docker container, I install Fail2Ban:
sudo apt install fail2ban -y
- I change to the fail2ban directory:
cd /etc/fail2ban
- I copy the
jail.conffile asjail.local:
sudo cp ./jail.conf ./jail.local
- I open the
jail.localfile in Nano:
sudo nano ./jail.local
- I change a few (SSH-centric) settings in the
jail.localfile, then I save those changes, and exit the Nano editor:
[DEFAULT]
. . .
bantime = 1d
maxretry = 3
. . .
destemail = your@email.here
sendername = Fail2Ban on Homelab

[sshd]
enabled = true
port = ssh,22
- I restart Fail2Ban:
sudo systemctl restart fail2ban
- I check the status of Fail2Ban:
sudo systemctl status fail2ban
- I enable Fail2Ban to autostart on boot:
sudo systemctl enable fail2ban
Now that I have hardened the Docker container, the next step is to create, and use, RSA keys from my workstation terminal.
Creating, and Using, RSA Keys.
These steps will enable SSH sessions to the remote container, across the LAN, without needing a password.
Creating an RSA Key Pair on the Local Workstation.
- From the
workstationterminal (CTRL+ALT+T), I start the ssh-agent:
eval "$(ssh-agent -s)"
- I generate a pair of RSA keys called "/home/brian/.ssh/container-name" (where I replace "container-name" with the actual name of the container):
ssh-keygen -b 4096
NOTE: It is my convention to name RSA keys after the container or system on which they will be used.
- I add my SSH private key to the ssh-agent (where I replace "container-name" with the actual name of the container):
ssh-add /home/brian/.ssh/container-name
The next step is to upload the local public key to the remote Docker container.
Uploading a Public Key to the Remote Container.
- From the
workstationterminal, I use "ssh-copy-id" to upload the locally-generated public key to the remote container (where I replace "container-name" with the actual name of the container):
ssh-copy-id -i /home/brian/.ssh/container-name.pub yt@192.168.?.?
NOTE: I replace the "?" with the actual IP address for the container.
The next step is to use SSH to login to the remote container.
Using SSH to Login to the Remote Container.
- From the
workstationterminal, I login to the “yt” account of the remote container:
ssh 'yt@192.168.?.?'
NOTE: I replace the "?" with the actual IP address for the container.
The last step is to apply more hardening to the container.
More Hardening of the Container.
- From the
workstationterminal, I open the "sshd_config" file in the remote container:
sudo nano /etc/ssh/sshd_config
- I edit, and save, the following "sshd_config" settings:
PermitRootLogin no
PasswordAuthentication no
Protocol 2
NOTE: Another change I typically make is switching out the default port number of 22 for something less obvious, e.g. 4444 (which is also too
obvious so don't use port 4444):port 4444
- I restart the "ssh" service:
sudo systemctl restart ssh.service
- I reboot the remote container:
sudo reboot
NOTE: Running the
exit,sudo reboot, orsudo poweroffcommands will close the connection to the remotehomelabhost.
- Finally, I test the connection to the remote container:
ssh -p '4444' 'yt@192.168.?.?'
NOTE: I replace the -p(ort) number with the actual port defined in the "sshd_config" file, and replace the "?" with the actual octet for the container.
And that's it.
The Results.
This post demonstrated how to create a Docker-compatible LinuXContainer, set up storage for Docker, install Docker within the container, add a user account to the container, install an SSH server, create RSA keys on another PC, upload the public key to the Docker container, connect to the Docker container without using a username or password, and further harden the container by disabling the PasswordAuthentication feature. Understanding the appropriate use of virtual machines, LXCs, and Docker containers is crucial in modern engineering, as each technology offers unique benefits and efficiencies.
In Conclusion.
LXCs are great virtualization technologies because they are more resource-efficient than virtual machines. For the sake of clarity, I should also point out that Docker containers are way more efficient than LXCs. Of course, unlike virtual machines and LXCs, Docker containers do NOT run operating systems.
I think virtual machines, LXCs, and Docker containers, have their roles to play in modern engineering. The trick lies in knowing which to use for any given problem.
Be sure to check out my next post in this series where I install a local copy of Docker Desktop and connect it to the remote container.
Until next time: Be safe, be kind, be awesome.
Homelab | LXD Manager | Docker | Docker Desktop | Deno | MariaDB | Portainer | More Docker | Docker Swarm | CrowdSec