
Thank you for reading this post.
My name is Brian and I'm a developer from New Zealand. I've been interested in computers since the early 1990s. My first language was QBASIC. (Things have changed since the days of MS-DOS.)
I am the managing director of a one-man startup called Digital Core (NZ) Limited. I have accepted the "12 Startups in 12 Months" challenge so that DigitalCore will have income-generating products by April 2024.
This blog will follow the "12 Startups" project during its design, development, and deployment, cover the Agile principles and the DevOps philosophy that is used by the "12 Startups" project, and delve into the world of AI, machine learning, deep learning, prompt engineering, and large language models.
I hope you enjoyed this post and, if you did, I encourage you to explore some others I've written. And remember: The best technologies bring people together.
Homelab | LXD Manager | Docker | Docker Desktop | Deno | MariaDB | Portainer | More Docker | Docker Swarm | CrowdSec
Updated: Sunday 29th October, 2023.
TL;DR.
LXD is a container manager for creating and managing containers. A remote homelab, for me, is simply an Intel NUC (Next Unit of Computing) that hosts containers. Most of my experiments involve passing data between containers.
This article covers setting up my remote homelab, hardening the lab with UFW and Fail2Ban, preparing an empty partition for LXD (LinuXDaemon), installing the LXD manager, initializing LXD, testing a few LXC (LinuXContainer) commands, and listing a few LXC commands that I find useful.
An Introduction.

My first post in this 8-part mini-series covered why I'm building a homelab. This time, I'm going to show how I'm setting up my remote homelab system.
The purpose of this post is to present my process for running LXD on my
homelab.
My focus throughout this post is to describe how I download and deploy the LXD container manager onto my remote, Ubuntu-based homelab system.
LXD is what I use to create some of my containers.
NOTE: Actually, there are TWO container technologies I want to use at my startup:
LXD (which I'll explain in a moment), and
Docker (which I'll cover over the the remaining FOUR posts that make up this mini-series.)
LXD stands for LinuXDaemon and is pronounced: "lexdee". This is a container manager that runs as a background process on my homelab. It is a tool that helps me manage the containers that I "spin up", "tear down", and use.
LXC stands for LinuXContainer and is pronounced: "lexsee". These are the container instances that can run concurrently on a single host. These containers use the Linux kernel of the host system, as well as other OS resources, to reduce the overhead of running multiple, isolated occurrences.
NOTE: I can also spin up a virtual machine by using the
--vmflag. When they're initialised, virtual machines download, and use, a kernel within the container itself. Virtual machines are useful when I need functionality that is not supported by the host kernel, or when I want to run a completely different operating system form the host.
The Big Picture.
This is part 2 of an 8-part mini-series, and a great way to introduce a high concept like mine is to have a 10,000-metre overview. Here's the thing: What I'm about to describe might blow your mind and you may need to wipe some brain matter off your monitor. Keep some tissues handy.
Containers are technical constructs that I use to test the viability of my ideas and concepts. Remember, I'll be running containers on my homelab and, as the name implies, I'll be using this "lab" to conduct my experiments.
The results from each experiment will result in a write-up. That's the purpose of these posts; to describe:
The methods I use,
The results I achieve, and
The conclusions I make.
That's right, I'm using the Scientific Method as the foundation for my posts. This entire blog should provide a clear path for engineers to follow while empowering them to modify these methods to meet their own needs.
As I mentioned, containers are technical entities, but they are also conceptual models. This means that containers can represent real-world, hosted servers (provided by Linode, Digital Ocean, etc.). The interactions these servers might have with each other will be patterned after successful container experiments that I'll run on my homelab. In other words, the services these containers provide will eventually run on actual servers. The way I'll make my containers work together shows how I want my hosted servers to work together.
For a solo developer like me, using containers to realise my Technical Designs, and then running security checks and ethical hacks on (and from within) these containers is simply one practice (among many) that may be used to validate my designs.
Truthfully, I have no idea how I'm going to build these tests, but that's the whole point of building a homelab. For developing my tests, I would probably develop a proto-method, run the experiments, and publish the results, e.g: Step 1 - Ask the Internet. Step 2 - Build a construct. Step 3 - Simulate a load. Step 4 - Measure the results. Step 5 - Change a parameter. Step 6 - Return to Step 3.
This is the big picture, every picture tells a story, and my story starts here.
First, I'll start by providing my local workstation system with access to the remote homelab system while blocking EVERY OTHER SYSTEM IN THE WORLD.
Enabling, and Setting Up, UFW.
The Uncomplicated FireWall is a wrapper utility that makes setting up, and using, iptables very simple. It is easy to learn and extremely user-friendly. UFW is the first utility, in a toolbox of devices, that is used to "harden" a system.
Hardening is the process of reducing an "attack surface", and blocking potential "vectors", that malicious actors could exploit to execute their virulent activities. In other words, I will use any tool, and change any setting, to minimise the chances of "black hats", cyber-criminals, and/or foreign states, using my systems to harm others.
- On the remote
homelabsystem, I run the updates and upgrades:
sudo apt clean && sudo apt update && sudo apt dist-upgrade -y && sudo apt autoremove -y
- I check the UFW status:
sudo ufw status
- I enable the UFW:
sudo ufw enable
- I install a UFW rule:
sudo ufw allow from 192.168.0.?
NOTE: I replace the IP address above with the actual address for the
workstation, e.g. 192.168.188.41.
- I check the UFW status:
sudo ufw status
NOTE: UFW will, by default, block all incoming traffic, including SSH and HTTP.
ANOTHER NOTE: I will update the UFW rules as I deploy other services to the
homelab.
- I list the UFW rules by number:
sudo ufw status numbered
- I delete a UFW rule by number:
sudo ufw delete 1
- I disable UFW if required:
sudo ufw disable
Now that the UFW is setup, let's install another tool for hardening a system: Fail2Ban.
Attribution:
digitalocean.com
Installing, and Setting Up, Fail2Ban.

Fail2Ban protects Linux systems against many security threats, such as dictionary, DoS, DDoS, and brute-force attacks.
- On the remote
homelabsystem, I install Fail2Ban:
sudo apt install fail2ban -y
- I change to the fail2ban directory:
cd /etc/fail2ban
- I copy the
jail.conffile asjail.local:
sudo cp ./jail.conf ./jail.local
- I open the
jail.localfile in Nano:
sudo nano ./jail.local
- I change a few (SSH-centric) settings in the
jail.localfile, then I save those changes, and exit the Nano editor:
[DEFAULT]
⋮
bantime = 1d
maxretry = 3
⋮
[sshd]
enabled = true
port = ssh,22
- I restart Fail2Ban:
sudo systemctl restart fail2ban
- I check the status of Fail2Ban:
sudo systemctl status fail2ban
- I enable Fail2Ban to autostart on boot:
sudo systemctl enable fail2ban
The next step is to install the LXD manager which handles the containers, images, profiles, commands, and resources.
Installing the LXD Manager.

NOTE: Remember, LXD is an abbreviation for LinuX Daemon.
- On the remote
homelabsystem, I install the Snap package manager:
sudo apt install snapd
- I install the
LXDcontainer manager:
sudo snap install lxd
- I'll also add my account to the LXD group if needed:
sudo adduser yt lxd
NOTE: Adding myself to the LXD group means I can skip the
sudorequirement when issuing LXD and LXC commands.
If the time ever came, this is how I'd uninstall LXD.
Uninstall the LXD Manager.
- On the remote
homelabsystem, I uninstall the Snap package manager:
sudo snap remove --purge lxd
The next optional step is to set up an empty drive (or partition) where I can store my container images.
OPTIONAL: Preparing an Empty Drive (or Partition) for LXD Storage.

Using an empty drive (or partition) to store my images has advantages. I can:
Secure images with repeatable, scheduled backups (think: CRON Jobs),
Rebuild the host system without losing images,
Move the drive (or partition) to another system,
Improve reliability, performance, or capacity, by...
Enabling the cluster option, and/or
Including more drives.
Using an empty drive (or partition) to store my images has definite advantages. If this was a production system running a cluster, then I'd absolutely store my images on M.2 drives, SSDs, HDDs, and NAS systems.
- On the remote
homelabsystem, I use Gnome Disks to format an empty partition, for example, the/dev/sda2device pictured below:
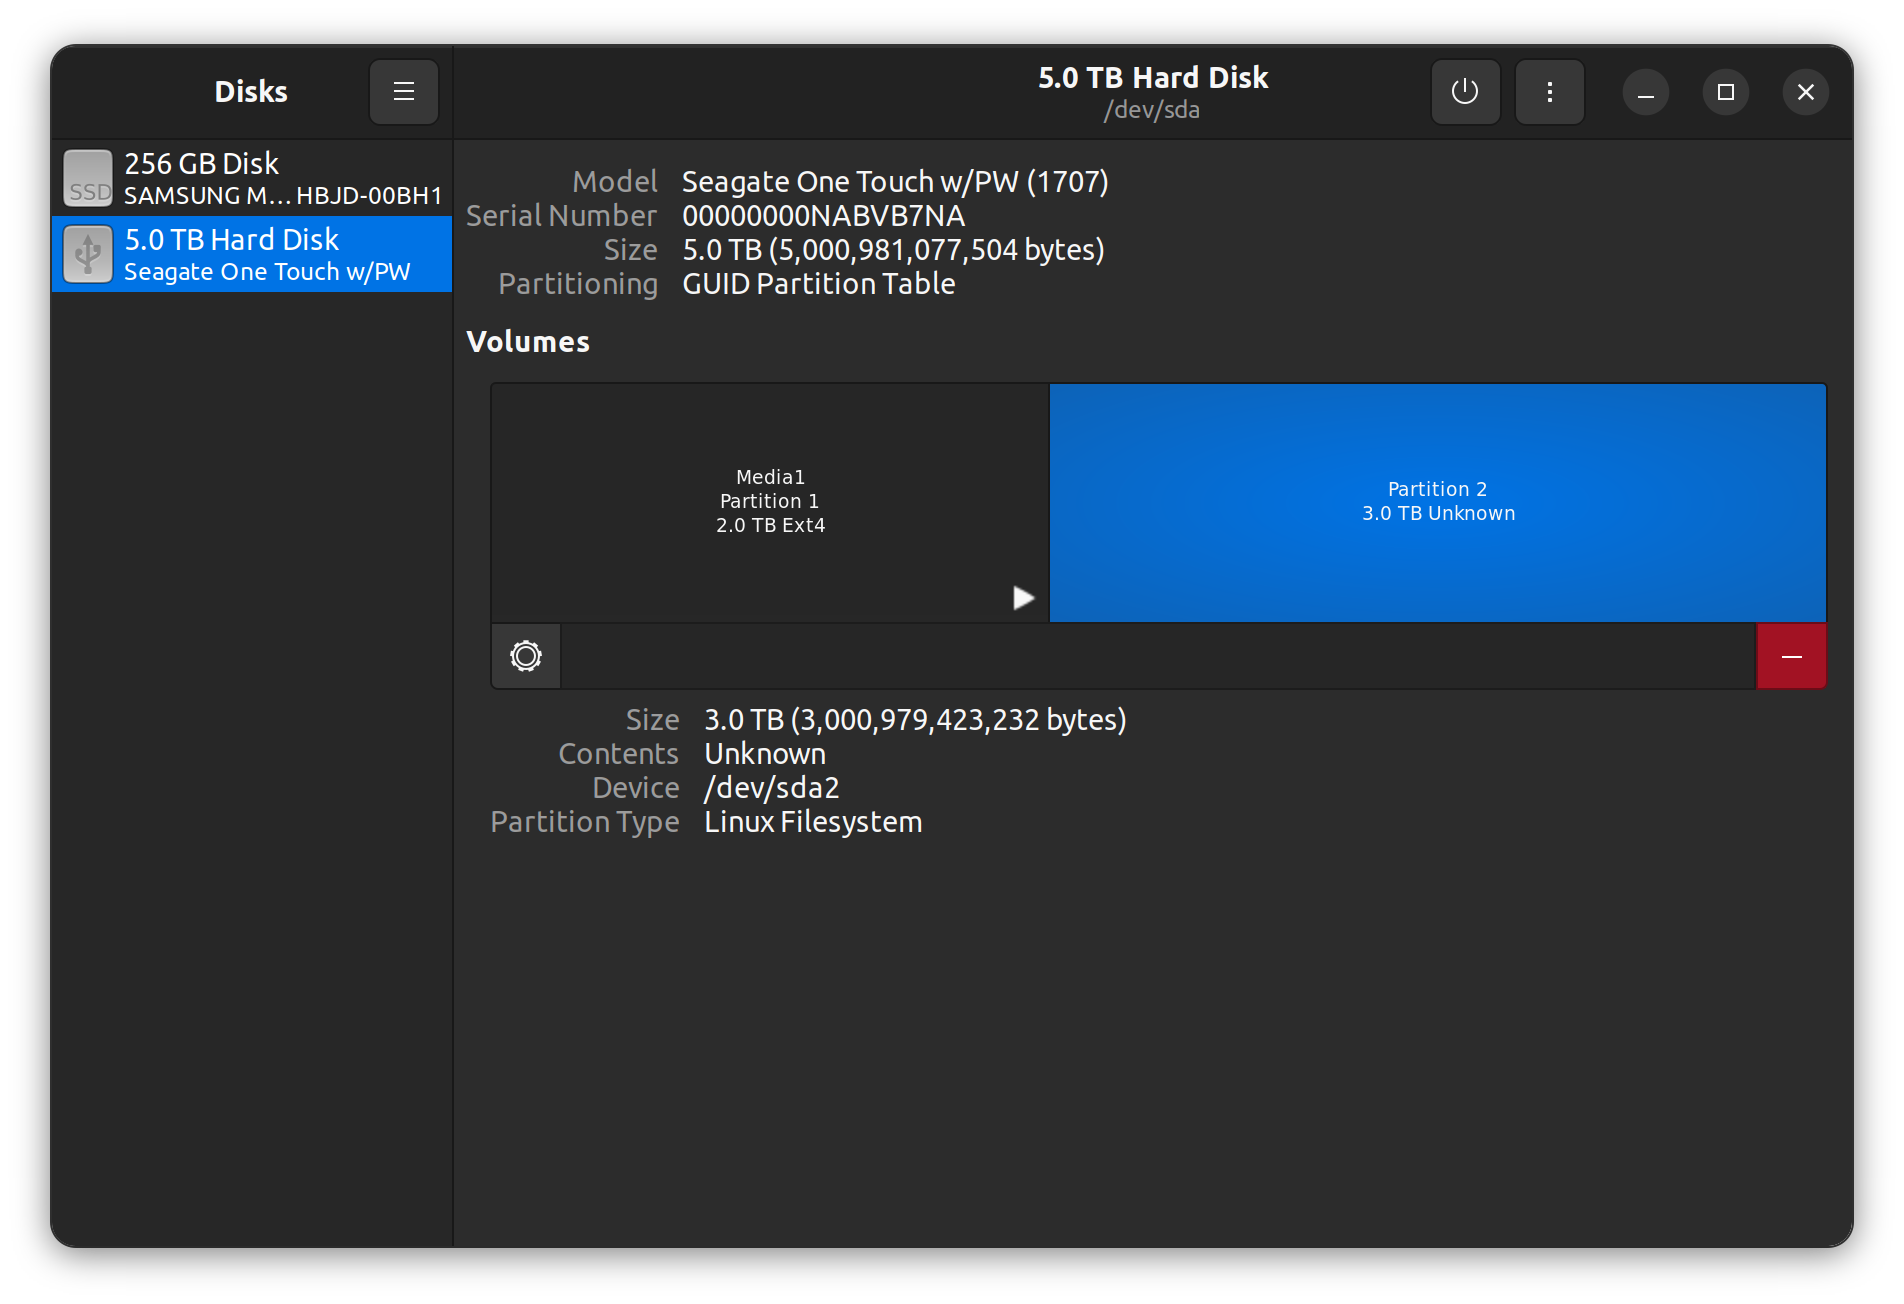
NOTE: In this example,
/dev/sda2is the partition device I've decided to use.
- I reboot the system:
reboot
- On the remote
homelabsystem, I list the PC hardware, e.g. eno1 (ethernet controller), /dev/sda2 (volume partition), etc.:
sudo lshw -short
- I unmount the empty partition:
sudo umount /dev/sda2
- I prepare the empty partition:
sudo dd if=/dev/zero of=/dev/sda2 bs=4M count=10
The next step is to initialise the LXD for use.
Initialising the LXD Manager.

- I initialise the LXD service and mostly use the default settings during setup:
lxd init
These are my settings when I initialise the LXD service:
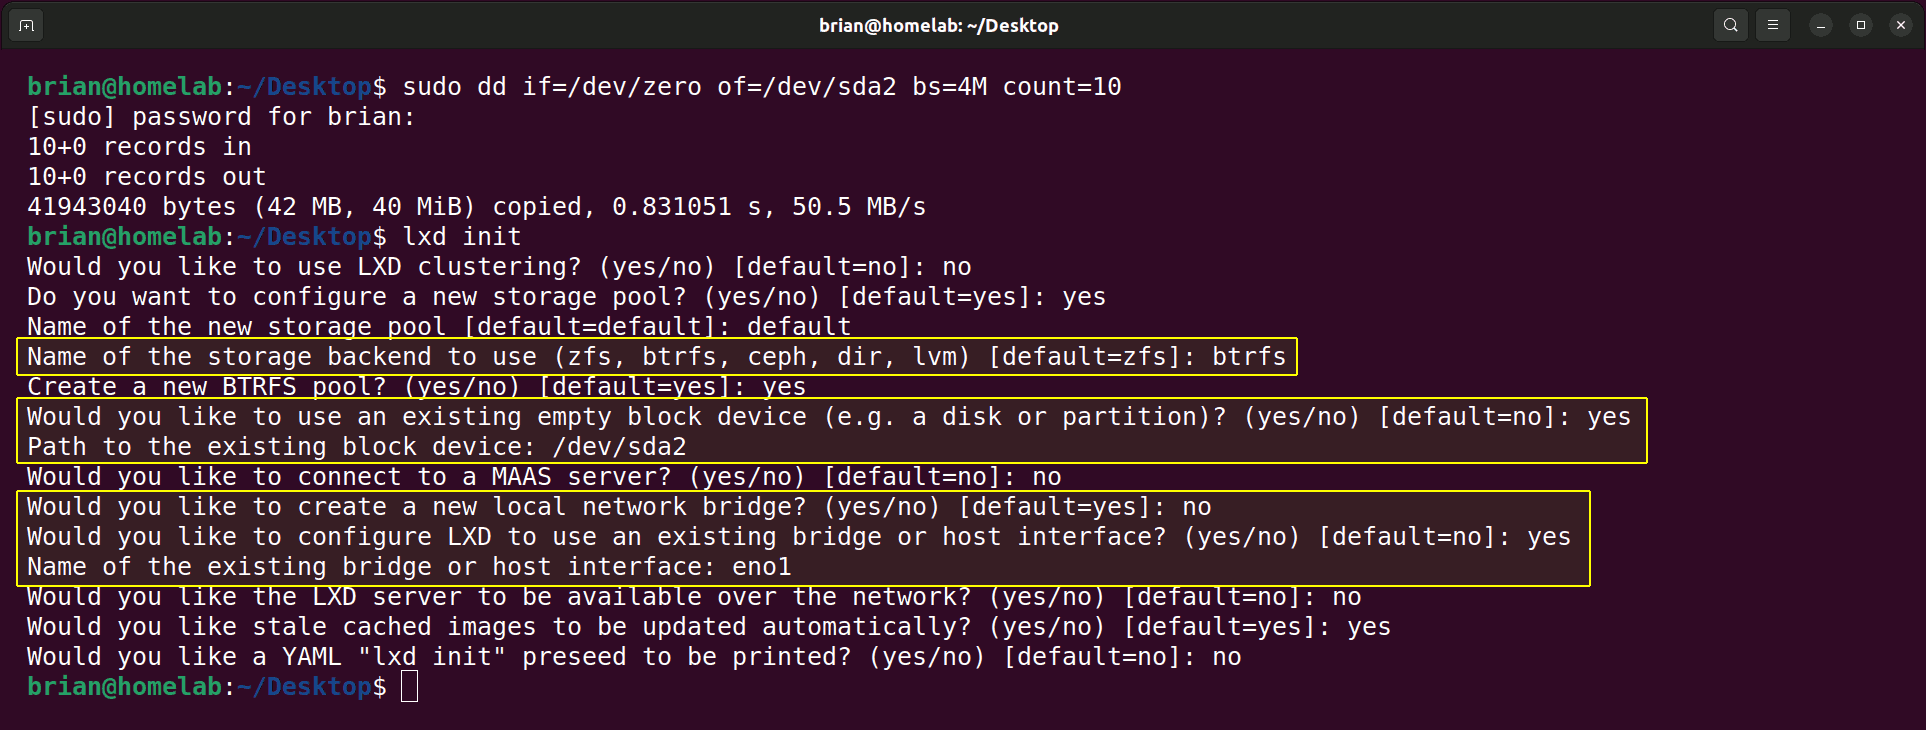
For the first highlighted section above, I chose BTRFS so I can use Docker,
For the second highlighted section above, I had a spare HDD partition and I wanted to experiment with this setting, and
For the third highlighted section above, I want each remote container on my
homelabto receive an IP address from my router. If I'm initialising an LXD on my localworkstation, I'd choose 'a new local network bridge' so I can use SSH connections from the same computer.
The last step is to test the LXC commands by spinning up and tearing down a couple of containers.
Running a Quick Test.

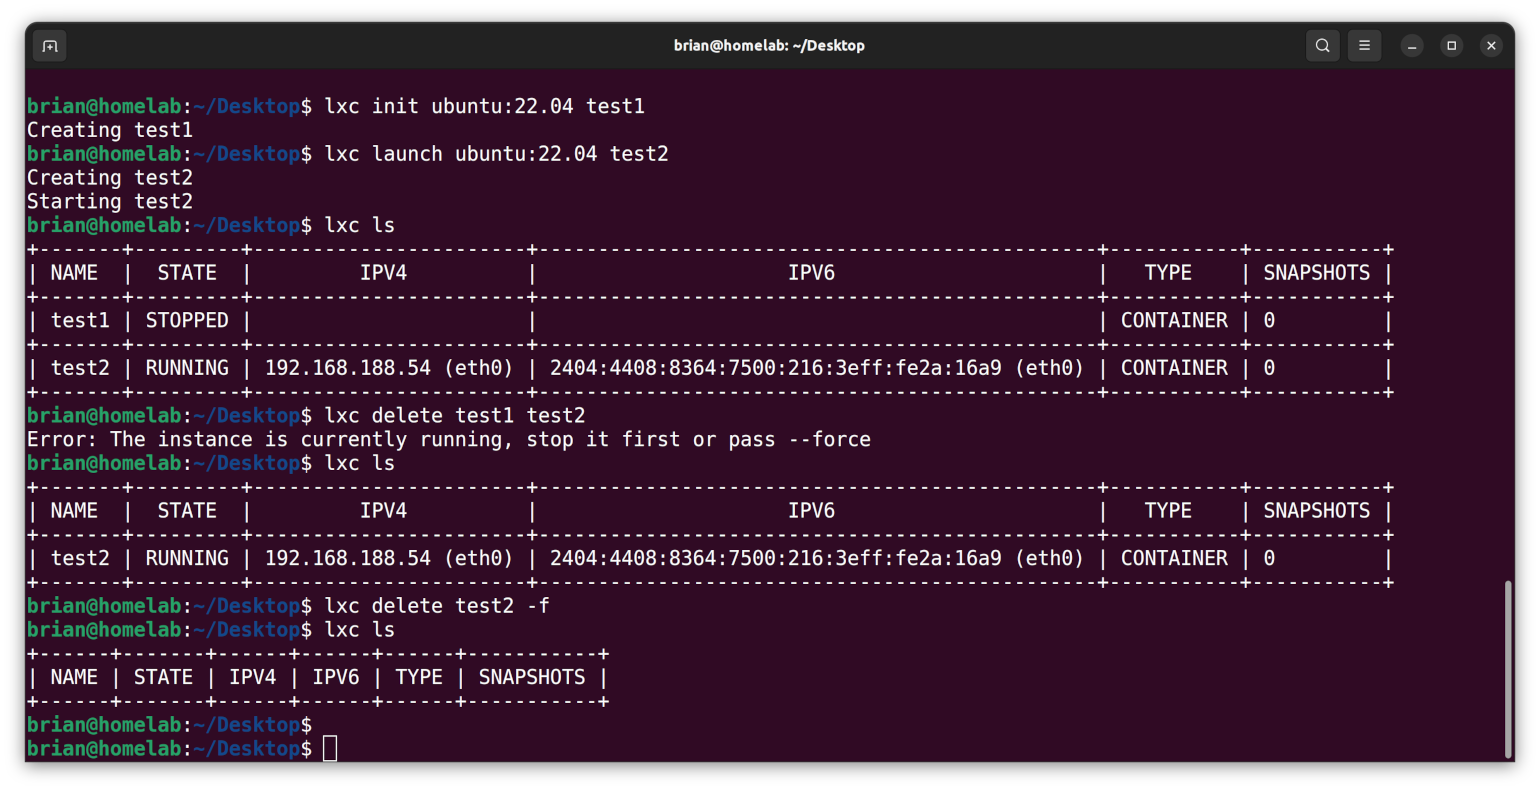
From the homelab system, I initialise an image called test1:
lxc init ubuntu:22.04 test1
- I launch a container called
test2:
lxc launch ubuntu:22.04 test2
- I list the containers:
lxc ls
NOTE:
lxc initcreates a static image,lxc launchcreates an image then runs it as a container.
- I (try to) delete
test1andtest2:
lxc delete test1 test2
- I list the containers again only to see that
test2still exists:
lxc ls
- I delete
test2using the -f(orce) flag:
lxc delete test2 -f
- I list the containers one more time to see everything has been deleted:
lxc ls
Here are my results:
Please note the following about these results:
"Creating test1" happened when I used
initto build the image, while..."Creating test2" and "Starting test2" happened when I used
launchto build the container,The
ls(list) command shows the test1 image has a STOPPED STATE while the test2 container has a RUNNING STATE, andThe delete command, which worked on the STOPPED STATE image of test1, did not work on the test2 container, until I used the
-f(force) flag. This flag put the container into a STOPPED STATE and then deleted test2 which, as a consequence of changing states, had become an image.
NOTE: While the
test1instance was NOT running, it was called an image. If I told it to START, then it would have become thetest1container. Thetest2instance WAS running, so it was called a container. If I told it to STOP, then it would have become thetest2image. Yet another example of useless trivia floating around in my brain.
20 Common LXC Commands.
LXC comes with a lot of controls, but I find these 20 commands very useful:
lxc --versionto check the version (and if the command doesn't work, then I'd know an installation problem occurred),lxc network listto list all the network adapters,lxc launch ubuntu:22.04 test-container3to launch a container,lxc storage lsto list storage pool,lxc listorlxc lsto list all the running containers,lxc stop test-container3to stop a container,lxc start test-container3to start a container,lxc restart test-container3to restart a container,lxc stop test-container3followed bylxc delete test-container3, orlxc delete test-container3 -fto delete a container,lxc exec test-container3 cat /etc/os-releaseto execute a command on the container,lxc info test-container3to check a container's Information,lxc exec test-container3 -- bashto get shell access to an LXC container as root,lxc image list images: | grep -i centosto list prebuilt images,lxc network show lxdbr0to display information about network interface(s),lxc profile show defaultto check the default profile using lxc command,lxc snapshot test-container3 test-container3_snapfollowed bylxc info test-container3to take snapshot of an instance,lxc restore test-container3 test-container3_snapto restore an instance from a snapshot,lxc export test-container3 /root/backup/lxd/test-container3_bkp--$(date +'%m-%d-%Y').tar.xz --optimized-storageto take backup of an instance,lxc import /root/backup/lxd/test-container3_bkp--05-07-2022.tar.xzfollowed bylxc listto restore instance from a backup, andlxc --helpto check all the options that are available to an LXC command.
Attribution:
https://www.cyberithub.com/20-best-lxc-command-examples-to-manage-linux-containers/
3 More LXC Commands.
There are three more LXC commands I often use:
lxc init ubuntu:22.04 test-container3
Both the lxc init command and the lxc launch command (number 3. above) will download the image file of the requested system, in these cases, ubuntu:22.04. However, the lxc launch command goes one step further: The image is advanced to a running state by loading it into memory, and a container is initialised.
NOTE: A container is simply an active, running instance of an image file. An image file is like the operating system (OS) files that are stored on an HDD or SSD when a PC is powered down. A container is like a running computer where the OS, utility, and app files have been loaded into memory.
lxc copy test-container3 test-container3-clone
The lxc copy command is used to create a complete clone of a container. The filesystem of the original container (test-container3) is copied to a new image (test-container3-clone), including any updates and installations. I typically create one container, install the updates, and then make copies of that container as needed. Making a copy of an updated container is fast and saves time, but only if I want to use the same system as a base for other container projects.
lxc exec test-container3 -- su mylogin
When logging in to the container, the su mylogin command tells test-container3 to switch the user to the mylogin account. For this to work, I would initially need to log in as root (number 12. above) and create the mylogin account.
The Results.
This post covered the setup and usage of UFW and Fail2Ban for security, preparing an empty partition for storage, installing and initializing LXD, and testing LXC commands. LXD is an excellent tool for creating and managing multiple containers on a single host, offering a clean and efficient development environment.
In Conclusion.

LXD is a great system for spinning up, and running, multiple LXCs on a single host. (I hate it when my computers become a cesspool of development debris and database detritus, so using disposable containers for experimental exercises is a great use case for me.) Docker is another container system that is extremely popular with developers.
Be sure to check out my next post in this series where I run a Docker service within an LXD container.
Until next time: Be safe, be kind, be awesome.
Homelab | LXD Manager | Docker | Docker Desktop | Deno | MariaDB | Portainer | More Docker | Docker Swarm | CrowdSec