TL;DR.
Installing Twinny for VS Code involves creating two Miniconda environments to run different variations of Code Llama using LiteLLM, which provides accessible IP addresses and ports for local LLMs. Twinny, an AI code completion tool, is integrated into this setup, enhancing coding efficiency by using these local models. This configuration not only boosts coding productivity but also allows for easy model upgrades and integration with other tools, like AutoGen Studio.
Attributions:
An Introduction.
Twinny is a code assistant for VS Code. LiteLLM provides Ollama managed LLMs (large language models) with LAN-based IP addresses and ports. Twinny is powered by these LLMs:
The purpose of this post is to show how to setup Twinny for practical use.
The Big Picture.
I was unable to run Twinny with the default settings (where Twinny has direct access to Ollama, and the models it manages). This post describes how I will use a potential alternative, where:
Two LiteLLM environments are used, and
Substitute settings are applied to Twinny.
As a bonus, I will also end up with two Miniconda environments where I can run two models that may be used by other tools, like AutoGen Studio. Another perk is that, due to Twinny supporting LiteLLM, the current models can be easily replaced because new models are usually, and quickly, supported by the Ollama team.
Prerequisites.
A Debian-based Linux distro (I use Ubuntu),
Updating my Base System.
- From the (base) Terminal, I update my (base) system:
sudo apt clean && \
sudo apt update && \
sudo apt dist-upgrade -y && \
sudo apt --fix-broken install && \
sudo apt autoclean && \
sudo apt autoremove -y
What is Anaconda and Miniconda?
Python projects can run in virtual environments. These isolated spaces are used to manage project dependencies. Different versions of the same package can run in different environments while avoiding version conflicts.
venv is a built-in Python 3.3+ module that runs virtual environments. Anaconda is a Python and R distribution for scientific computing that includes the conda package manager. Miniconda is a small, free, bootstrap version of Anaconda that also includes the conda package manager, Python, and other packages that are required or useful (like pip and zlib).
https://docs.anaconda.com/free/miniconda/index.html↗, and
https://solodev.app/installing-miniconda.
I ensure Miniconda is installed (conda -V) before continuing with this post.
Creating the 1st Miniconda Environment.
- I use the
condacommand to display alistof Minicondaenvironments:
conda env list
- I use
condatocreate, andactivate, a new environment named (-n) (CodeLlamaInstruct):
conda create -n CodeLlamaInstruct python=3.11 -y && conda activate CodeLlamaInstruct
NOTE: This command creates the (
CodeLlamaInstruct) environment, then activates the (CodeLlamaInstruct) environment.
Creating the CodeLlamaInstruct Home Directory.
NOTE: I will now define the home directory in the environment directory.
- I create the
CodeLlamaInstructhome directory:
mkdir ~/CodeLlamaInstruct
- I make new directories within the (
CodeLlamaInstruct) environment:
mkdir -p ~/miniconda3/envs/CodeLlamaInstruct/etc/conda/activate.d
- I use the Nano text editor to create the
set_working_directory.shshell script:
sudo nano ~/miniconda3/envs/CodeLlamaInstruct/etc/conda/activate.d/set_working_directory.sh
- I copy the following, paste (CTRL + SHIFT + V) it to the
set_working_directory.shscript, save (CTRL + S) the changes, and exit (CTRL + X) Nano:
cd ~/CodeLlamaInstruct
- I activate the (base) environment:
conda activate
- I activate the (
CodeLlamaInstruct) environment:
conda activate CodeLlamaInstruct
NOTE: I should now, by default, be in the
~/CodeLlamaInstructhome directory.
Creating the 2nd Miniconda Environment.
I open a 2nd Terminal tab.
I use the
condacommand to display alistof Minicondaenvironments (CodeLlamaInstructshould now be in that list):
conda env list
- I use
condatocreate, andactivate, a new environment named (-n) (CodeLlamaCode):
conda create -n CodeLlamaCode python=3.11 -y && conda activate CodeLlamaCode
NOTE: This command creates the (
CodeLlamaCode) environment, then activates the (CodeLlamaCode) environment.
Creating the CodeLlamaCode Home Directory.
NOTE: I will now define the home directory in the environment directory.
- I create the
CodeLlamaCodehome directory:
mkdir ~/CodeLlamaCode
- I make new directories within the (
CodeLlamaCode) environment:
mkdir -p ~/miniconda3/envs/CodeLlamaCode/etc/conda/activate.d
- I use the Nano text editor to create the
set_working_directory.shshell script:
sudo nano ~/miniconda3/envs/CodeLlamaCode/etc/conda/activate.d/set_working_directory.sh
- I copy the following, paste (CTRL + SHIFT + V) it to the
set_working_directory.shscript, save (CTRL + S) the changes, and exit (CTRL + X) Nano:
cd ~/CodeLlamaCode
- I activate the (base) environment:
conda activate
- I activate the (
CodeLlamaCode) environment:
conda activate CodeLlamaCode
NOTE: I should now, by default, be in the
~/CodeLlamaCodehome directory.
What is Ollama?
Ollama is a tool for downloading, setting up, and running LLMs (large language models). It helps me access powerful models like Llama 2 and Mistral and lets me run them on my local Linux, macOS, and Windows systems.
Ollama must be installed (ollama -v) before continuing with this post.
NOTE: I installed Ollama into my (base) system so it can run in any environment without independently installing it into every environment where it's needed.
What is LiteLLM?
LiteLLM provides LLMs with IP addresses. It is a unified interface that calls 100+ LLMs using the same Input/Output format, supporting OpenAI, Huggingface, Anthropic, vLLM, Cohere, and even custom LLM API services.
Using LiteLLM to Run Code Llama: Instruct.
I return to the 1st Terminal tab.
I install LiteLLM:
pip install litellm 'litellm[proxy]'
- I use LiteLLM to run Code Llama: Instruct:
litellm --port 5000 --model ollama/codellama:13b-instruct
NOTE: Code Llama: Instruct is now accessible from
http://localhost:5000.
Using LiteLLM to Run Code Llama: Code.
I switch to the 2nd Terminal tab.
I install LiteLLM:
pip install litellm 'litellm[proxy]'
- I use LiteLLM to run Code Llama: Code:
litellm --port 6000 --model ollama/codellama:13b-code
NOTE: Code Llama: Code is now accessible from
http://localhost:6000.
What is VS Code?
Visual Studio Code (VS Code) is a simple, yet powerful, code editor that works on my computer with versions for Windows, macOS, and Linux. It natively supports JavaScript, TypeScript, and Node.js. Other programming languages and technical abilities are available to VS Code through the use of appropriate Extensions.
https://code.visualstudio.com/↗.
What is Twinny?
Twinny is an AI code completion plugin for VS Code. It is also compatible with the VSCodium editor. Twinny is designed to seamlessly work with locally-hosted LLMs (large language models), frameworks, and tools. It supports FIM (fill in the middle) code completion by providing real-time, AI-based suggestions that help as I type my code. I can also discuss my code with an LLM via the sidebar, where I can:
Get explanations for how a function works,
Ask the LLM to generate tests,
Request code refactoring,
and more.
https://marketplace.visualstudio.com/items?itemName=rjmacarthy.twinny↗.
Installing Twinny.
- I click the Extensions icon in the left sidebar to open the Extensions tab:

NOTE: In the menu bar, I can also click
View > Extensionsto open the Extensions tab, or I can use the quick key combo:CTRL + SHIFT + X.
I type
twinnyin theSearch...dialogue box.I install the
twinny - AI Code...Extension fromrjmacarthy:

Setting Up Twinny.
NOTE: There are currently two instances of LiteLLM running slight variations of Code Llama. This section of the post changes the default settings so that Twinny can access these LiteLLM instances.
Also, the original settings used 7B models. I've switched to using 13B versions.
- I click the Twinny icon in the left sidebar to open the Twinny tab:

- At the top of the Twinny tab, I click the left-most
Manage twinny...icon (which looks like a power plug):

NOTE: Clicking the
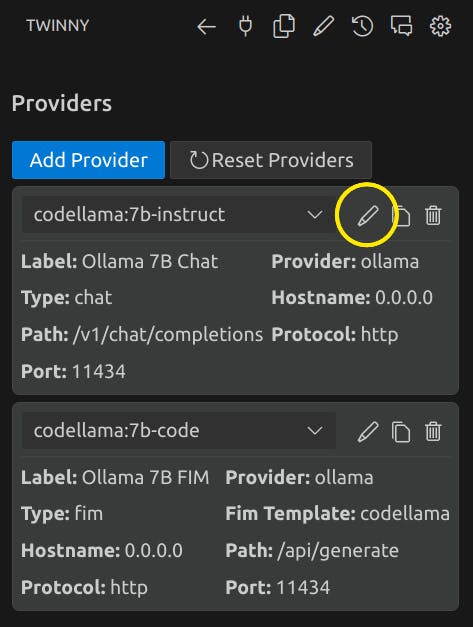
Manage twinny...icon displays two providers by default: The Instruct (Chat) Provider and the Code (FIM) Provider.
- In the Providers tab, I click the pencil icon for the
codellama:7b-instruct(Chat) Provider:

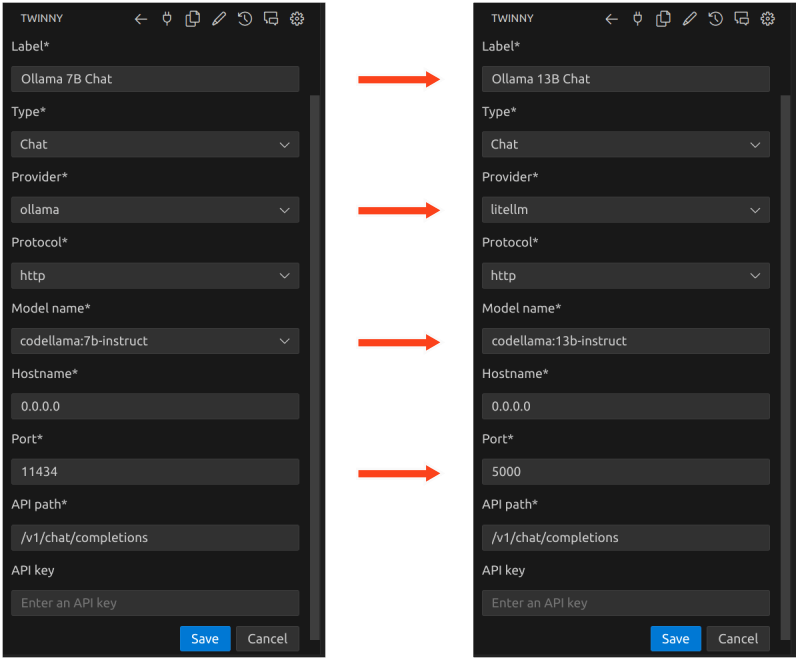
- I make the following changes to the Instruct (Chat) Provider, as per the image below, and then I click the blue
Savebutton after the changes are made:

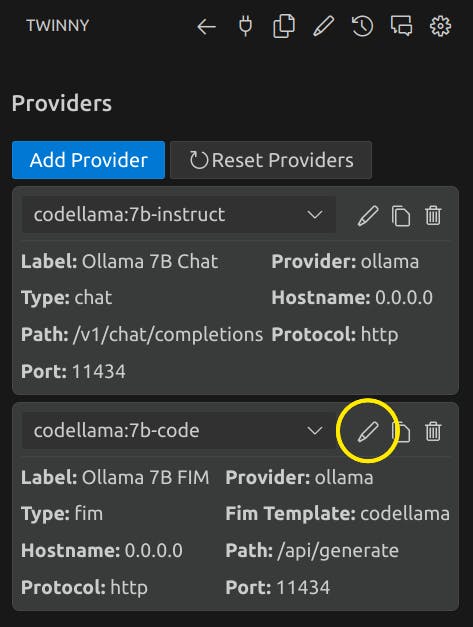
NOTE: Clicking the blue Save button returns me to the two Providers listed. Notice the changes that have been saved to the Instruct (Chat) Provider.
- In the Providers tab, I click the pencil icon for the
codellama:7b-code(FIM) Provider:

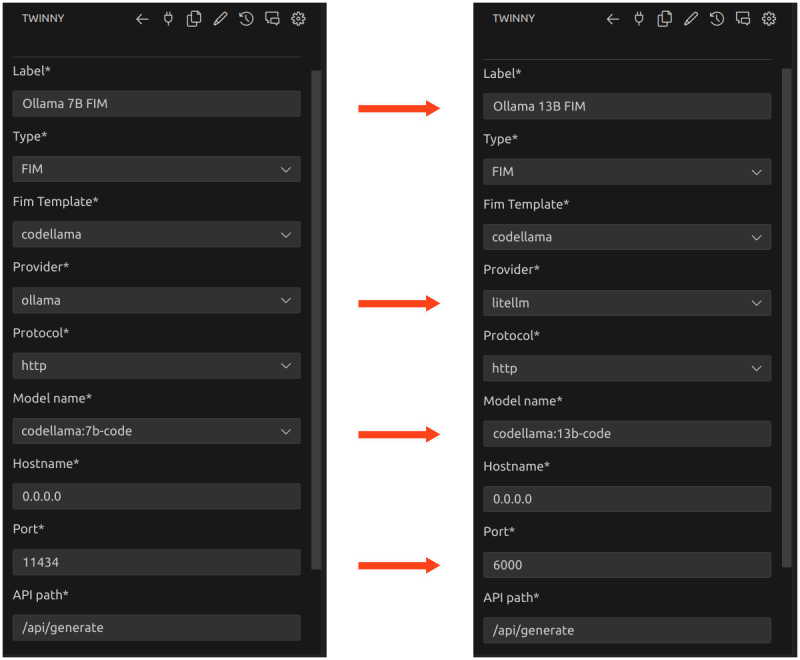
- I make the following changes to the Code (FIM) Provider, as per the image below, and then I click the blue
Savebutton after the changes are made:

The Results.
In this post, I explored the process of setting up Twinny, a powerful AI code completion tool for VS Code, using LiteLLM environments to manage different large language models. I created two separate Miniconda environments and configured them to run Code Llama: Instruct and Code Llama: Code. This install demonstrates a flexible setup that enhances coding efficiency and leverages the capabilities of local LLMs. This setup facilitates seamless model integration with VS Code through the use of Twinny. Using LiteLLM also offers the flexibility of switching between different language models and upgrading the models as needed. The potential to extend these models to other tools, like AutoGen Studio, further underscores the versatility of using LiteLLM with the Ollama LLM manager. Ultimately, this configuration allows me to harness AI-assisted coding within my local development environment.
In Conclusion.
I've supercharged VS Code thanks to Twinny, LiteLLM, and Ollama.
I desperately needed a new coding experience. To achieve this goal, I installed a VS Code extension called Twinny, which is a dynamic, AI-based, code completion tool.
Setting Up the Environment: I started by creating two Miniconda environments to run different variations of Code Llama. This boosts efficiency but also prepares my system for future upgrades and integrations with other tools, like AutoGen Studio.
Integrating LiteLLM: LiteLLM acts as a bridge, providing accessible IP addresses for accessing local LLMs across my LAN. With LiteLLM, I can easily switch between various language models or upgrade them without hassle.
Harnessing Twinny: Twinny leverages LLMs and offers real-time, AI-based coding suggestions. I've tailored Twinny to connect to my local LLMs, enhancing its functionality while providing more precise, and context-aware, coding assistance.
Results: The resulting setup provides a more intuitive, AI-enhanced coding environment that adapts to my needs, right within VS Code. This setup simplifies my management of large language models and also magnifies my coding productivity.
Have you considered integrating AI into your coding environment? What tools are you excited to explore? What's your experience with AI-assisted coding?
Let's discuss in the comments below!
Until next time: Be safe, be kind, be awesome.
#VisualStudioCode #Twinny #LiteLLM #Ollama #AI #LLMs #Miniconda #AIIntegration #PythonEnvironments #Coding Assistant #Innovation #Coding #CodeCompletion #SoftwareDevelopment #DeveloperProductivity #TechInnovation #TechTools
