

Creating a Local LinuX Container.
Or: Containing my Creations and Isolating my Inventions.

Thank you for reading this post.
My name is Brian and I'm a developer from New Zealand. I've been interested in computers since the early 1990s. My first language was QBASIC. (Things have changed since the days of MS-DOS.)
I am the managing director of a one-man startup called Digital Core (NZ) Limited. I have accepted the "12 Startups in 12 Months" challenge so that DigitalCore will have income-generating products by April 2024.
This blog will follow the "12 Startups" project during its design, development, and deployment, cover the Agile principles and the DevOps philosophy that is used by the "12 Startups" project, and delve into the world of AI, machine learning, deep learning, prompt engineering, and large language models.
I hope you enjoyed this post and, if you did, I encourage you to explore some others I've written. And remember: The best technologies bring people together.
Update: Friday 9th February 2024.
TL;DR.
This post provides a step-by-step guide to creating and configuring a local Linux container on a Debian-based Linux distro. It covers the procedures of creating a new container, adding a user account, fixing home directory issues, and setting up security measures like UFW, Fail2Ban, and CrowdSec.
Attributions:
An Introduction.
A container is an isolated system that can run processes, procedures, and programs without affecting other containers or the base distro.
The purpose of this post is to produce a template for creating containers.
The Big Picture.
Containers, unlike virtual machines, are lightweight and efficient. Yes, containers rely on the host kernel, but it's a small price to pay for a capable containment technology.
Prerequisites.
A Debian-based Linux distro (I use Ubuntu), and
an LXD installation.
Updating the System.
- I update my system:
sudo apt clean && \
sudo apt update && \
sudo apt dist-upgrade -y && \
sudo apt --fix-broken install && \
sudo apt autoclean && \
sudo apt autoremove -y
What is LXD and LXC?
LXD (LinuX Daemon) is a container manager for creating and managing LXCs (LinuX Containers.) As a background service, LXD can automatically start containers when the host system boots.
LXCs (LinuX Containers) are isolated, OS-level virtualizations which, for efficiency, uses the Linux kernel of the host system. LXCs are virtual environments where its system processes can not affect other containers, or the host system, without running specific commands.
Installing the LXD.
- I install the snap package manager, if required:
sudo apt install snapd -y
- I install the LXD:
sudo snap install lxd
- I initialise the LXD:
lxd init
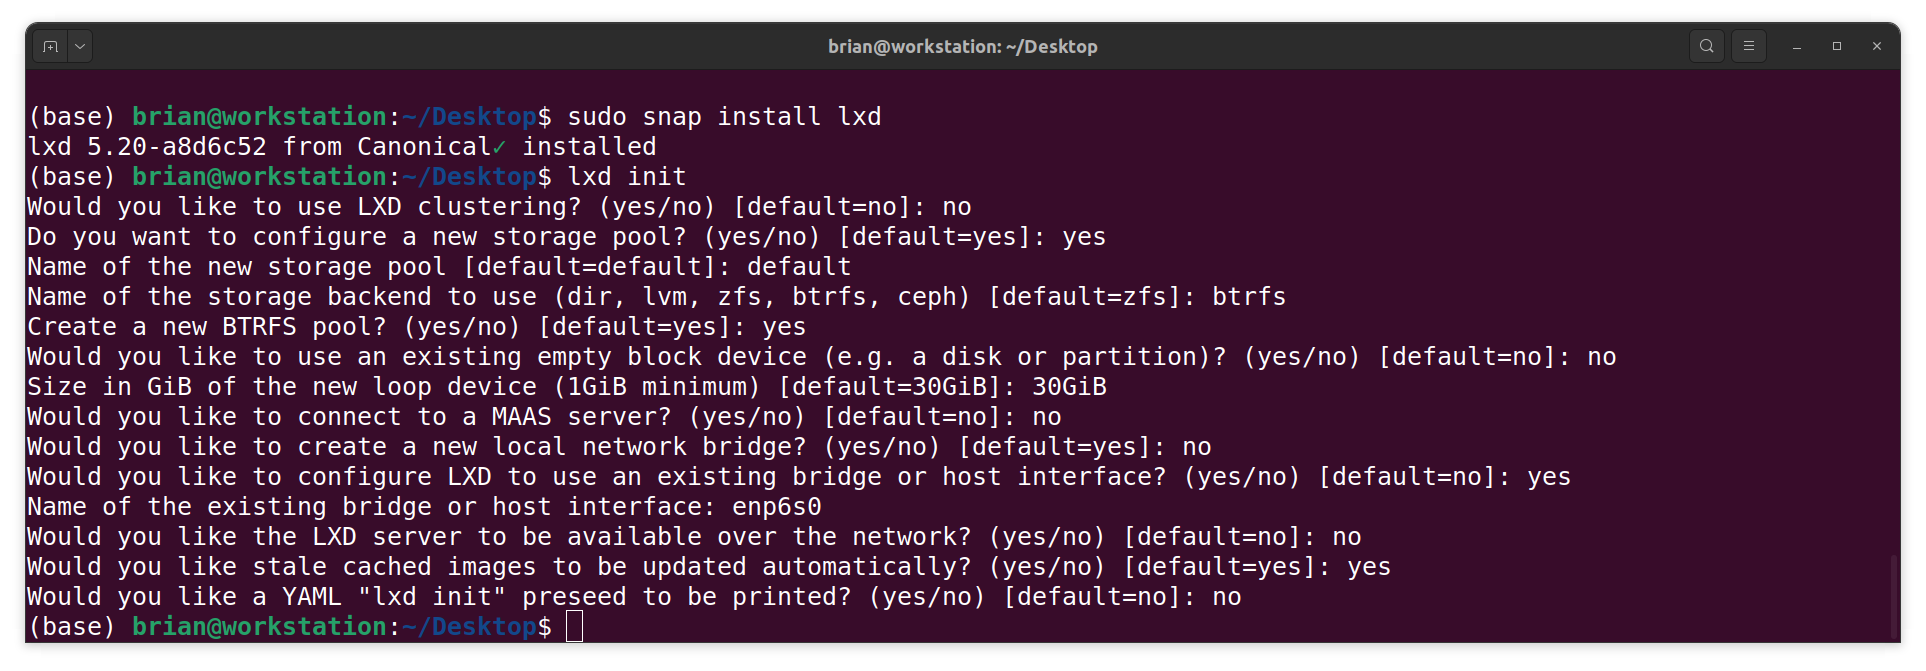
NOTE: I choose to use BTRFS and an existing host interface called enp6s0.
(I used theip addrcommand to find the name of my host interface.)
Deleting the LXD.
- I can delete the LXD:
sudo snap remove --purge lxd
- I can delete the LXD installer:
sudo apt remove --purge lxd-installer
NOTE: The
--purgeflag removes of everything, including configuration files, etc.
Creating a New Container.
NOTE: The "container-name" below is a placeholder. This placeholder should be replaced with an actual container name.
- From the terminal, I create a new container:
lxc launch ubuntu:22.04 container-name
- I bash into the container:
lxc exec container-name -- bash
- I update and upgrade the container:
sudo apt clean && \
sudo apt update && \
sudo apt dist-upgrade -y && \
sudo apt autoclean && \
sudo apt --fix-broken install && \
sudo apt autoremove -y
Adding a User Account to the Container.
- From within the container, I create a new user:
adduser yt
- I add the new user to the 'sudo' group:
usermod -aG sudo yt
NOTE: usermod let's me (-a)ppend the sudo (-G)roup to the 'yt' account.
- I reboot the container:
reboot
The next step is to fix the home directory problem.
Fixing the Home Directory Problem.
NOTE: I use Nano to add an entry to the
.bashrcfile.
- From the terminal, I log in to the container with the 'yt' account:
lxc exec container-name -- su yt
- I open the
.bashrcfile with the Nano text editor:
sudo nano ~/.bashrc
- I add the following to the bottom of the file, save (CTRL +S) the changes, and exit (CTRL + X) the Nano text editor:
cd ~
- I reboot the container:
sudo reboot
Top 20 LXC Commands.
LXC comes with a lot of controls, but I find these 20 commands very useful:
lxc --versionto check the version (and if the command doesn't work, then I'd know an installation problem occurred),lxc network listto list all the network adapters,lxc launch ubuntu:22.04 test-container3to launch a container,lxc storage lsto list storage pool,lxc listorlxc lsto list all the running containers,lxc stop test-container3to stop a container,lxc start test-container3to start a container,lxc restart test-container3to restart a container,lxc stop test-container3followed bylxc delete test-container3, orlxc delete test-container3 -fto delete a container,lxc exec test-container3 cat /etc/os-releaseto execute a command on the container,lxc info test-container3to check a container's Information,lxc exec test-container3 -- bashto get shell access to an LXC container as root,lxc image list images: | grep -i centosto list prebuilt images,lxc network show lxdbr0to display information about network interface(s),lxc profile show defaultto check the default profile using lxc command,lxc snapshot test-container3 test-container3_snapfollowed bylxc info test-container3to take snapshot of an instance,lxc restore test-container3 test-container3_snapto restore an instance from a snapshot,lxc export test-container3 /root/backup/lxd/test-container3_bkp--$(date +'%m-%d-%Y').tar.xz --optimized-storageto take backup of an instance,lxc import /root/backup/lxd/test-container3_bkp--05-07-2022.tar.xzfollowed bylxc listto restore instance from a backup, andlxc --helpto check all the options that are available to an LXC command.
Attribution:
https://www.cyberithub.com/20-best-lxc-command-examples-to-manage-linux-containers/
OPTIONAL: Enabling, and Setting Up, UFW.
- From the terminal, I log in to the container with the 'yt' account:
lxc exec container-name -- su yt
- I check the UFW status:
sudo ufw status
- I enable the UFW:
sudo ufw enable
- I install a UFW rule:
sudo ufw allow from 192.168.?.?
NOTE: I use
ip ain my workstation terminal to find my IP address. I replace the IP address above with the actual address for theworkstation, e.g. 192.168.188.41.
- I check the status of the UFW and list the rules by number:
sudo ufw status numbered
NOTE 1: UFW will, by default, block all incoming traffic, including SSH and HTTP.
NOTE 2: I will update the UFW rules as I deploy other services to the container.
- I delete a UFW rule by number if needed:
sudo ufw delete 1
- I disable UFW if needed:
sudo ufw disable
- I reboot the container:
sudo reboot
OPTIONAL: Installing, and Setting Up, Fail2Ban.
- From the terminal, I log in to the container with the 'yt' account:
lxc exec container-name -- su yt
- From the
homelabterminal (CTRL+ALT+T) connected to the container, I install Fail2Ban:
sudo apt install fail2ban -y
- I copy the
jail.conffile asjail.local:
sudo cp /etc/fail2ban/jail.conf /etc/fail2ban/jail.local
- I open the
jail.localfile in Nano:
sudo nano /etc/fail2ban/jail.local
- I change a few (SSH-centric) settings in the
jail.localfile, then I save those changes, and exit the Nano editor:
[DEFAULT]
⋮
bantime = 1d
maxretry = 3
⋮
[sshd]
enabled = true
port = ssh,22
- I restart Fail2Ban:
sudo systemctl restart fail2ban
- I check the status of Fail2Ban:
sudo systemctl status fail2ban
- I enable Fail2Ban to autostart on boot:
sudo systemctl enable fail2ban
- I reboot the container:
sudo reboot
OPTIONAL: Installing, and Setting Up, CrowdSec.
I can also use CrowdSec as another security layer.
The Results.
Linux containers provide a lightweight and efficient alternative to traditional virtual machines. This guide outlined the process of creating and configuring a local Linux container, with additional steps for adding user accounts, resolving common issues, and implementing security measures such as UFW, Fail2Ban, and CrowdSec. While containers do rely on the host kernel, the benefits they offer in terms of performance and resource utilization make them a worthwhile consideration for any developer or system administrator. Understanding containers and how to use them effectively is key to maximizing their potential.
In Conclusion.
Linux containers are an efficient alternative to traditional virtual machines and offer a lightweight solution that maximizes performance and resource utilization. Unlike virtual machines, containers are designed to be efficient but they rely on the host kernel.
I've outlined step-by-step procedures to creating and configuring local Linux containers while also covering how to add user accounts, resolving common issues, and implementing security measures such as UFW, Fail2Ban, and CrowdSec.
These containers are a game-changer for developers and system administrators, offering benefits that make them a worthwhile consideration in my tech stack. Knowing about containers and how to use them is important for getting the most out of this technology.
What are your thoughts on using Linux containers? Have you used them before? Let's discuss below!
Until next time: Be safe, be kind, be awesome.